Linux Basics
This post lists essential commands and concepts which would be helpful to a Linux user. We would cover Linux concepts, boot process, file system, GUI, terminals, basic utilities and operations, networking, process, bash and a lot more. We have used different illustrations by Julia Evans that helps to explain few concepts digramwise. Information is also added from the free Linux Foundation - Introduction to Linux course and Kali Linux Revealed 1st edition.
Linux Concepts
Linux is a full multi-tasking, multi-user OS with built-in networking and service processes known as daemons.
Terminology
Kernel
The kernel is considered the brain of the Linux OS. It controls the hardware and makes the hardware interact with the applications. Example: Linux kernel.
Userspace
User space (or userland) refers to all code that runs outside the operating system’s kernel.
User space usually refers to the various programs and libraries that the operating system uses to interact with the kernel: software that performs input/output, manipulates file system objects, application software, etc.
Distribution
A distribution (Distros) is a collection of programs combined with the Linux kernel to make up a Linux-based OS. Example: Red Hat Enterprise Linux, Fedora, Ubuntu, and Gentoo.
Boot loader
The boot loader is a program that boots the OS. Examples: GRUB and ISOLINUX.
Service
A service is a program that runs as a background process. Example: httpd, nfsd, ntpd, ftpd, and named.
X Window System
The X Window System provides the standard toolkit and protocol to build graphical user interfaces on nearly all Linux systems.
Desktop Environment
The desktop environment is a graphical user interface on top of the OS. Example: GNOME, KDE, Xfce, and Fluxbox
Command Line
The command line is an interface for typing commands on top of the OS. It is a text-based interface that allows to enter commands, execute them, and view the results.
Shell
The shell is the command-line interpreter that interprets the command line input and instructs the OS to perform any necessary tasks and commands. Example: bash, tcsh, and zsh.
The trailing
$or#character indicates that the shell is awaiting the input. It also indicates whether Bash recognizes as a normal user (the dollar,$) or as a super user (the hash,#).The shell executes each command by running the first program of the given name found in a directory listed in the
PATHenvironment variable.
What is Shell
Partition
A partition is a logical part of the disk. By dividing the hard disk into partitions, data can be grouped and separated as needed. When a failure or mistake occurs, only the data in the affected partition will be damaged. In contrast, the data on the other partitions will likely survive.
Filesystem
A filesystem is a method for storing and organizing files in Linux. Example: ext3, ext4, FAT, XFS, and Btrfs.
Device files
There are two types of device files:
Block
A block of data that has a finite size, and any particular byte can be accessed at any position in the block.
Disk drives and partitions use block devices
Character
A flow of characters that can be read and written, but we access to a particular position and change arbitrary bytes is not possible.
Mouse, keyboard, and serial ports use character devices.
To check for a paritcular device file, inspect the first letter in the output of ls -l. It would be b for block devices, or c, for character devices.
$ ls -l /dev/m*
 crw-rw----+ 1 root video 506, 0 Mar 20 14:32 /dev/media0
 crw-rw----+ 1 root video 506, 1 Mar 20 14:32 /dev/media1
 crw-rw----+ 1 root video 506, 2 Mar 20 14:32 /dev/media2
 crw-r-----  1 root kmem    1, 1 Mar 20 14:32 /dev/mem
 brw-rw----  1 root disk  179, 0 Mar 20 14:32 /dev/mmcblk0
 brw-rw----  1 root disk  179, 1 Mar 20 14:32 /dev/mmcblk0p1
 brw-rw----  1 root disk  179, 2 May 22 15:54 /dev/mmcblk0p2
Linux Development Process
Developers submit the code to the Linux kernel by breaking changes into individual units called patches.
A patch describes the lines that need to be changed, added, or removed from the source code. Each patch can add a new feature, new support for a device, fix a problem, improve performance, or rework code to be more easily understood.
Developers post their patches to the relevant mailing list where other developers can reply with feedback.
When the patch is close to being release-ready, it is accepted by a senior Linux kernel developer or maintainer who manages different kernel sections.
When the maintainer finishes their review (more extensive evaluation), they will sign off on the patch and send it off to the Linux creator and Linux Foundation fellow (Linus Torvalds). Linus has the ultimate authority on what is accepted into the next release.
Linux Families
Linux (at a very high level) refers to the OS Kernel, i.e., the basic program that communicates with the hardware (CPU, memory, and attached devices) and the applications that run on the computer.
There are currently (the year 2021) three major Linux distribution families.
Redhat Family
Red Hat Enterprise Linux (RHEL) heads the family, including CentOS, Fedora, and Oracle Linux.
SUSE Family
SUSE (SUSE Linux Enterprise Server (SLES)) and openSUSE
Uses the RPM-based
zypperpackage manager to install, update, and remove packages in the system.Includes the YaST (Yet Another Setup Tool) application for system administration purposes.
Debian Family
Uses the DPKG-based APT package manager (using
apt,apt-get,apt-cache) to install, update, and remove packages in the system.
Linux Applications
Linux offers a wide variety of Internet applications, such as web browsers, email clients, online media applications.
Web browsers supported by Linux can be either graphical or text-based, such as Firefox, Google Chrome, Epiphany, w3m, lynx.
Linux supports graphical email clients, such as Thunderbird, Evolution, Claws Mail, and text-mode email clients, such as Mutt and mail.
Linux systems provide many other applications for performing Internet-related tasks, such as Filezilla, XChat, Pidgin.
Most Linux distributions offer LibreOffice to create and edit different kinds of documents.
Linux systems offer entire suites of development applications and tools, including compilers and debuggers.
Linux systems offer several
sound players including Amarok, Audacity, and Rhythmbox.
movie players, including VLC, MPlayer, Xine, and Totem.
movie editors, including Kino, Cinepaint, Blender, among others.
The GIMP (GNU Image Manipulation Program) utility is a feature-rich image retouching and editing tool available on all Linux distributions.
Other graphics utilities that help perform various image-related tasks are eog, Inkscape, convert, and Scribus.
Linux Boot Process
The Linux boot process is the procedure for initializing the system. It consists of everything from when the computer power is first switched on until the user interface is fully operational.
Basic Input/Output System (BIOS) starts the boot loader.
Boot loader loads the kernel into memory.
The Kernel mounts disks/partitions and starts the init daemon.
The init daemon starts services based on the run level.
The boot process has multiple steps, starting with BIOS, which triggers the boot loader to start up the Linux kernel. From there, the initramfs filesystem is invoked, which triggers the init program to complete the startup process.
BIOS
Computer is powered on.
POST (Power On Self Test) starts the BIOS stored on a ROM chip on the motherboard, initializes the hardware, including the screen and keyboard, and tests the main memory.
The remainder of the boot process is controlled by the OS.
Master Boot Record (MBR) and Boot Loader
After POST, the system control passes from the BIOS to the boot loader.
The boot loader is usually stored on one of the hard disks in the system.
either in the boot sector (for traditional BIOS/MBR systems) or
the EFI partition ((Unified) Extensible Firmware Interface or EFI/UEFI systems).
Information on date, time, and the most important peripherals are loaded from the CMOS values. CMOS is a battery-powered memory store, which allows the system to keep track of the date and time even when it is powered off.
Several boot loaders exist for Linux; the most common ones are
GRUB (for GRand Unified Boot loader),
ISOLINUX (for booting from removable media), and
DAS U-Boot (for booting on embedded devices/appliances).
Linux boot loaders can present a user interface for choosing alternative options for booting Linux and even other OSs that might be installed.
The boot loader is responsible for loading the kernel image and the initial RAM disk or filesystem into memory. The init RAM disk contains critical files and device drivers needed to start the system.
Boot loader in action
The boot loader has two distinct stages:
First stage
For systems using the BIOS/MBR method
The boot loader resides at the first sector of the hard disk (Master Boot Record (MBR)). The size of the MBR is just 512 bytes.
The boot loader examines the partition table and finds a bootable partition. Once it finds a bootable partition, it searches for the second stage boot loader, GRUB, and loads it into RAM (Random Access Memory).
For systems using the EFI/UEFI method
UEFI firmware reads its Boot Manager data to determine which UEFI application is to be launched and from which disk/partition.
The firmware then launches the UEFI application, for example, GRUB, as defined in the boot entry in the firmware’s boot manager.
Second stage
The second stage boot loader resides under
/boot.A splash screen is displayed, which allows us to choose which OS (OS) to boot.
After choosing the OS, the boot loader loads the kernel of the selected OS into RAM and passes control to it.
Kernels are almost always compressed, so their first job is to uncompress themselves. After this, it will check and analyze the system hardware and initialize any hardware device drivers built into the kernel.
Initial RAM Disk
The
initramfsfilesystem image contains programs and binary files that perform all actions needed to mount the proper root filesystem.The actions include providing kernel functionality for the required filesystem and device drivers for mass storage controllers with a facility called udev (for user device).
udev is responsible for figuring out which devices are present, locating the device drivers they need to operate correctly, and loading them.
After the root filesystem has been found, it is checked for errors and mounted.
The
mountprogram instructs the OS that a filesystem is ready for use and associates it with a particular point in the overall hierarchy of the filesystem (the mount point). If the above is successful, the initramfs is cleared from RAM, and the/sbin/initprogram is executed.inithandles the mounting and pivoting over to the final real root filesystem. If special hardware drivers are needed before the mass storage can be accessed, they must be in theinitramfsimage.
Text-Mode Login
Near the end of the boot process, init starts several text-mode
logins prompts. These enable the user to provide credentials and get a
command shell.
The terminals which run the command shells can be accessed using the ALT
key plus a function key. Most distributions start with six text
terminals and one graphics terminal starting with F1 or F2.
Within a graphical environment, switching to a text console requires
pressing CTRL-ALT + the appropriate function key (with F7 or F1
leading to the GUI).
Kernel, Init and Services
The boot loader loads both the kernel and an initial RAM-based file
system (initramfs) into memory to be used directly by the kernel.
When the kernel is loaded in RAM, it immediately initializes and configures the computer’s memory and configures all the hardware attached. This includes all processors, I/O subsystems, storage devices. The kernel also loads some necessary user-space applications.
/sbin/init and services
Once the kernel has set up all its hardware and mounted the root
filesystem, the kernel runs /sbin/init. This then becomes the
initial process, which then starts other processes to get the system
running. Most other processes on the system ultimately trace their
origin to init; exceptions include the so-called kernel processes.
These are started by the kernel directly, and their job is to manage
internal OS details.
Besides starting the system, init is responsible for keeping the
system running and shutting it down cleanly. init manages the
non-kernel processes; it cleans up after completion and restarts user
login services when users log in/log in out, other background system
services starts/stops.
The process startup was performed using System V variety of UNIX. This serial process has the system passing through a sequence of run levels containing collections of scripts that start and stop services. Each run level supports a different mode of running the system. Within each runlevel, individual services can be set to run or shut down if running.
However, all major recent distributions have moved away from this sequential runlevel method of system initialization, although they usually support the System V conventions for compatibility purposes.
The two main alternatives developed were:
Upstart
Developed by Ubuntu and first included in 2006. Adopted in Fedora 9 (in 2008) and RHEL 6 and its clones.
systemd
Adopted by Fedora first (in 2011). Adopted by RHEL 7 and SUSE. Replaced Upstart in Ubuntu 16.04
Systems with systemd start up faster than those with earlier init
methods. systemd replaces a serialized set of steps with aggressive
parallelization techniques, permitting multiple services to be initiated
simultaneously.
Simpler configuration files (systemd) have replaced complicated
startup shell scripts (System V). systemd provides information on
pre-checks before service starts, how to execute service startup, and
how to determine startup has finished. One thing to note is that
/sbin/init now just points to /lib/systemd/systemd;
i.e. systemd takes over the init process.
Starting, stopping, restarting a service (using nfs as an example)
on a currently running system:
sudo systemctl start|stop|restart nfs.service
Enabling or disabling a system service from starting up at system boot
sudo systemctl enable|disable nfs.service
Listing all services
sudo systemctl list-units --type=service
sudo systemctl --type=service
or show only active services
systemctl list-units --type=service --state=active

systemctl status : Output shows a hierarchical overview of the running services
Each service is represented by a service unit, which is described by a service file usually shipped in
/lib/systemd/system/(or/run/systemd/system/, or/etc/systemd/system/;They are listed by increasing order of importance, and the last one wins). Each is possibly modified by other
service-name.service.d/*.conffiles in the same set of directories.
Sample service file for ssh
$ cat /lib/systemd/system/ssh.service

[Unit]
Description=OpenBSD Secure Shell server
Documentation=man:sshd(8) man:sshd_config(5)
After=network.target auditd.service
ConditionPathExists=!/etc/ssh/sshd_not_to_be_run

[Service]
EnvironmentFile=-/etc/default/ssh
ExecStartPre=/usr/sbin/sshd -t
ExecStart=/usr/sbin/sshd -D $SSHD_OPTS
ExecReload=/usr/sbin/sshd -t
ExecReload=/bin/kill -HUP $MAINPID
KillMode=process
Restart=on-failure
RestartPreventExitStatus=255
Type=notify
RuntimeDirectory=sshd
RuntimeDirectoryMode=0755

[Install]
WantedBy=multi-user.target
Alias=sshd.service
Target units represent a desired state that we want to attain in terms of activated units (which means a running service in the case of service units). They exist mainly as a way to group dependencies on other units. When the system starts, it enables the units required to reach the
default.target(which is a symlink tographical.target, and which in turn depends onmulti-user.target). So all the dependencies of those targets get activated during boot.Such dependencies are expressed with the
Wantsdirective on the target unit. We can create a symlink pointing to the dependent unit in the/etc/systemd/system/target-name.target.wants/directory. When we enable a service,systemdadd a dependency on the targets listed in theWantedByentry of the[Install]section of the service unit file. Conversely,systemctldisablefoo.servicedrops the same symlink and thus the dependency.
Linux Runlevels
Linux has six runlevels 0-6. Scripts are contained in /etc/rc[0-6,S].d/.
Each folder contains the scripts followed by either K or S. If the first
letter is K that script is not executed. If S, that script is executed.
/etc/inittab contains the default run level.
I D |
Name |
Description |
|---|---|---|
0 |
Halt |
Shuts down the system |
1 |
Single user Mode |
Mode for administrative tasks. |
2 |
Multi user Mode |
Does not configure network interfaces and does not export networks services |
3 |
Multi user Mode with Net working |
Starts the system normally. |
4 |
Not used/ User-de finable |
For special purposes. |
5 |
Start system normally with display manager (with GUI). |
Same as runlevel 3 + display manager |
6 |
Reboot |
Reboot the system |
Linux Filesystem
Different types of filesystems supported by Linux:
Conventional disk filesystems: ext2, ext3, ext4, XFS, Btrfs, JFS, NTFS, etc.
Flash storage filesystems: ubifs, JFFS2, YAFFS, etc.
Database filesystems
Special purpose filesystems: procfs, sysfs, tmpfs, squashfs, debugfs, etc.
Data Distinctions
Variable vs. Static
Static data include binaries, libraries, documentation, and anything that does not change withoutsystem administrator assistance.
Variable data is anything that may change even without a system administrator’s help.
Linux Directories
/root          : (slash-root) is the home directory for the root user.
/home          : users home directories.
/etc           : system-wide configuration files.
/bin           : directories with executable files.
/usr/bin
/usr/local/bin
/lib           : shared libraries needed to upport the applications.
/usr/lib
/usr/local/lib
/sbin          : directories with executables supposed to be run by the Superuser.
/usr/sbin
/usr/local/sbin
/tmp           : temporary directories, watch out as /tmp is, by default, cleaned out on each reboot.
/var/tmp
/usr/share/doc : complete system documentation.
/usr/share/man
/dev           : system device files. In Unix, hardware devices are represented as files.
/proc          : "virtual" directory containing files through which you can query or tune Linux kernel settings.
/boot          : contains the basic files needed to boot the system.
/media         : Mount points for removable media such as CDs, DVDs, USB sticks, etc.
/mnt           : Temporarily mounted filesystems.
/opt           : Optional application software packages.
/run           : Run-time variable data, containing information describing the system since it was booted.
/sys           : Virtual sysfs pseudo-filesystem giving information about the system and processes running on it.
/var           : Variable data that changes during system operation.
/srv           : contains site-specific data which is served by this system.
Filesystems are mounted on the mount point that could be simply a directory (which may or may not be empty) where the filesystem is grafted.
/bin
The /bin directory contains executable binaries, essential commands
used to boot the system or in single-user mode, and essential commands
required by all system users, such as cat, cp, ls, mv,
ps, and rm.
/sbin
The /sbin directory is intended for essential binaries related to
system administration, such as fsck and ip. Commands that are
not essential (theoretically) for the system to boot or operate in
single-user mode are placed in the /usr/bin and /usr/sbin
directories.
/proc
/proc are called pseudo-filesystems because they have no permanent
presence anywhere on the disk, and they exist only in memory.
The /proc filesystem contains virtual files (files that exist only
in memory). It includes files and directories that mimic kernel
structures and configuration information. It does not have real files
but runtime system information, e.g., system memory, devices mounted,
hardware configuration, etc. Some necessary entries in /proc are:
/proc/cpuinfo
/proc/interrupts
/proc/meminfo
/proc/mounts
/proc/partitions
/proc/version
/proc has subdirectories, including:
/proc/<Process-ID-#>
/proc/sys
The
/proc/<Process-ID-#>shows a directory for every process running on the system, which contains vital information about it.The
/proc/sysshows a virtual directory containing a lot of information about the entire system, particularly its hardware and configuration.
/dev
The /dev directory contains device nodes, a pseudo-file used by most
hardware and software devices, except for network devices. This
directory is:
Empty on the disk partition when it is not mounted
Contains entries created by the
udevsystem, which creates and manages device nodes on Linux, creating them dynamically when devices are found. The/devdirectory contains items such as:/dev/sda1(first partition on the first hard disk)/dev/lp1(second printer)/dev/random(a source of random numbers).
/var
The /var directory contains files that are expected to change in
size and content as the system is running (var stands for variable),
such as the entries in the following directories:
/var/log   : System log files.
/var/lib   : Packages and database files
/var/spool : Print queues.
/var/tmp   : Temporary files
/var/lock  : Lock files used to control simultaneous access to resources
/var/www   : Root for website hierarchies
The /var directory may be put on its own filesystem so that the
growth of the files can be accommodated and any exploding file sizes do
not fatally affect the system. Network services directories such as
/var/ftp (the FTP service) and /var/www (the HTTP web service)
are also found under /var.
/etc
The /etc directory is the home for system configuration files. It
contains no binary programs, although there are some executable scripts.
For example, /etc/resolv.conf tells the system where to go on the
network to obtain hostname to IP address mappings (DNS). Files like
passwd, shadow, and group for managing user accounts are
found in the /etc directory.
Note
/etc is for system-wide configuration files, and only the superuser can modify files there. User-specific configuration files are always found under their home directory.
/etc/skel    : Contains skeleton files used to populate newly created home directories.
/etc/systemd : Contains or points to configuration scripts for starting, stopping system services when using systemd.
/etc/init.d  : Contains startup and shut down scripts when using System V initialization.
/boot
The /boot directory contains the few essential files needed to boot
the system. For every alternative kernel installed on the system, there
are four files:
vmlinuz : The compressed Linux kernel required for booting.
initramfs : The initial ram filesystem, required for booting, sometimes called
initrd, notinitramfs.config : The kernel configuration file, only used for debugging and bookkeeping.
System.map : Kernel symbol table, only used for debugging.
Each of these files has a kernel version appended to its name.
The Grand Unified Bootloader (GRUB) files such as
/boot/grub/grub.conf or /boot/grub2/grub2.cfg are also found
under the /boot directory.
/lib
/lib contains libraries (common code-shared by applications and
needed for them to run) for the essential programs in /bin and
/sbin. These library filenames either start with ld or lib.
For example, /lib/libncurses.so.5.9.
These are dynamically loaded libraries (also known as shared libraries
or Shared Objects (SO)). On some Linux distributions, there exists a
/lib64 directory containing 64-bit libraries, while /lib
contains 32-bit versions.
Kernel modules (kernel code, often device drivers, that can be loaded
and unloaded without restarting the system) is located in
/lib/modules/<kernel-version-number>. PAM (Pluggable Authentication
Modules) files are stored in /lib/security.
Others
/opt: Optional application software packages/sys: Virtual pseudo-filesystem giving information about the system and the hardware. It can be used to alter system parameters and for debugging purposes./srv: Site-specific data served up by the system/tmp: Temporary files; on some distributions erased across a reboot and/or may be a ramdisk in memory/usr: Multi-user applications, utilities, and data/usr/include: Header files used to compile applications./usr/lib: Libraries for programs in /usr/bin and /usr/sbin./usr/lib64: 64-bit libraries for 64-bit programs in /usr/bin and /usr/sbin./usr/sbin: Non-essential system binaries, such as system daemons./usr/share: Shared data used by applications, generally architecture-independent./usr/src: Source code, usually for the Linux kernel./usr/local: Data and programs specific to the local machine. Subdirectories include bin, sbin, lib, share, include, etc./usr/bin: This is the primary directory of executable commands on the system
In Linux, a file’s extension often does not categorize it the way it
might in other OSs. One cannot assume that a file named file.txt is
a text file and not an executable program.
The real nature of a file can be ascertained by using the file
utility. For the file names given as arguments, it examines the contents
and certain characteristics to determine whether the files are plain
text, shared libraries, executable programs, scripts, or something else.
Other Information
File System Superblock
The superblock stores the metadata of the file system, such as
Blocks in the file system
No of free blocks in the file system
Inodes per block group
Blocks per block group
No of times the file system was mounted since last fsck.
Mount time
UUID of the file system
Write time
File System State (i.e., was it cleanly unmounted, errors detected)
The file system type (i.e., whether it is ext2,3 or 4).
The OS in which the file system was formatted
View superblock information
dumpe2fs -h /dev/sda4
dumpe2fs 1.42.9 (4-Feb-2014)
Filesystem volume name:   cloudimg-rootfs
Last mounted on:          /
Filesystem UUID:          f75f9307-27dc-xxxx-87b7-xxxxxxxxx
Filesystem magic number:  0xEF53
Filesystem revision #:    1 (dynamic)
Filesystem features:      has_journal ext_attr resize_inode dir_index filetype needs_recovery extent flex_bg sparse_super large_file huge_file uninit_bg dir_nlink extra_isize
Filesystem flags:         signed_directory_hash
Default mount options:    (none)
Filesystem state:         clean
Errors behavior:          Continue
Filesystem OS type:       Linux
.....sniped.......
du
Estimate file space usage
du
  -h                : human readable
  -x                : skip directories on different file system
  -c                : show the totals
  --exclude=PATTERN : exclude files that match PATTERN
Show disk usage
du -xhcx --exclude=proc * : provide the disk usage while excluding proc directory
mkfs
MaKe FileSystem handle formatting. It requires as a parameter, a device file representing the partition to be formatted (for instance, /dev/sdb1). The operation is destructive and will format the partition and create a filesystem.
GUI and Terminal
X Window System
The X Window System (X) is loaded as one of the final steps in the boot process.
A service called the Display Manager keeps track of the displays being provided and loads the X server (so-called, because it provides graphical services to applications, sometimes called X clients). The display manager also handles graphical logins and starts the appropriate desktop environment after a user logs in.
A desktop environment consists of a session manager, which starts and maintains the components of the graphical session, and the window manager, which controls the placement and movement of windows, window title bars, and controls. Although these can be mixed, generally, a set of utilities, session manager, and window manager are used together as a unit and provide a seamless desktop environment.
If the display manager is not started by default in the default run level. The graphical desktop can be started differently, such as logging on to a text-mode console by running
startxfrom the command line. Or, start the display manager (gdm,lightdm,kdm,xdm, etc.) manually from the command line. This differs from runningstartxas the display managers will project a sign-in screen.Logging out through the desktop environment kills all processes in your current X session and returns to the display manager login screen.
gnome-tweak-toolexposes several setting options regarding graphical display.
Current screen resolution
xdpyinfo | grep dim
dimensions: 3200x1080 pixels (847x286 millimeters)
Turn off the graphical desktop
Linux distributions can start and stop the graphical desktop in various ways.
For the newer systemd-based distributions, the display manager is run as
a service. The GUI desktop can be stopped with the systemctl
utility, and most distributions will also work with the telinit
command. telinit can be used to change the SysV system runlevel.
sudo systemctl stop gdm (or sudo telinit 3)
and restart it (after logging into the console) with:
sudo systemctl start gdm (or sudo telinit 5)
On Ubuntu versions before 18.04 LTS, substitute lightdm for gdm.
Terminal Emulator
A terminal emulator program emulates (simulates) a standalone terminal
within a window on the desktop. It is equivalent to logging into the
machine at a pure text terminal with no running graphical interface. The
gnome-terminal application is used to emulate a text-mode terminal in a
window. Other available terminal programs include xterm, rxvt,
konsole (default on KDE), terminator.
Virtual Terminal
Virtual Terminals (VT) are console sessions that use the entire display and keyboard outside of a graphical environment. Such terminals are considered “virtual” because, although there can be multiple active terminals, only one terminal remains visible at a time.
To switch between VTs, press the CTRL-ALT-function key for the VT.
For example, press CTRL-ALT-F6 for VT 6.
Screen Multiplexer
tmux
tmux is a terminal multiplexer: it enables a number of terminals to
be created, accessed, and controlled from a single screen.
tmux new -s myname            : start new with session name
tmux list-sessions            : show sessions
tmux ls                       : show sessions
tmux list-windows             : show windows
tmux attach-session -t myname : Attach to session named "myname"
tmux a -t myname              : Attach to session named "myname"
(Prefix) + d                  : detach. By default, tmux uses Ctrl b as the prefix key
Windows (Tabs)
(Prefix Key) +
c  create window
w  list windows
n  next window
p  previous window
f  find window
,  name window
&  kill window
"  split pane horizontally.
%  split pane vertically.
arrow key — switch the pane.
Hold Ctrl+b, don't release it, and hold one of the arrow keys — resize the pane.
tmux.conf
# Enable mouse mode
set -g mouse on
Reloading tmux config
Suppose we have made changes to the tmux configuration file in the
~/.tmux.conf file, it shouldn’t be necessary to start the server up
again from scratch with kill-server. Instead, the current tmux session
can reload the configuration with the source-file command. This can
be done either from within tmux, by pressing Ctrl+B or
Prefix key and then : to bring up a command prompt, and typing:
:source-file ~/.tmux.conf
Or simply from a shell:
tmux source-file ~/.tmux.conf
This should apply your changes to the running tmux server without
affecting the sessions or windows within them.
Tmux Copy Paste
For copying,
Press the
Shiftkey; i.e.,Shift-MouseHighlightproperly selects text and - still holding down the shift key; right-click and get the standard bash context menu with Copy, Paste, etc.or
Ctrl-Shift-CandCtrl-Shift-Vdo work to copy and paste the text.
Basic Utilities and Operations
Binary Locations
Depending on the specifics of a particular distribution policy, programs
and software packages are installed in various directories. In general,
executable programs and scripts should live in the /bin,
/usr/bin, /sbin, /usr/sbin directories, or somewhere under
/opt. They can also appear in /usr/local/bin and
/usr/local/sbin.
Command-line Parameters
Most input lines entered at the shell prompt have three essential elements:
Command
Options
Arguments
The command is the name of the program you are executing. It may be
followed by one or more options (or switches) that modify what the
command may do. Options usually start with one or two dashes, such as
-p or --print, to differentiate them from arguments,
representing what the command operates on.
Getting Help
The primary sources of Linux documentation are the man pages, GNU
info, the help options and commands, and a wide variety of
online documentation sources. Further, Eric Raymond’s guidelines on How To Ask Questions The Smart Way is a good way to avoid the most common mistakes and get useful answers.
man
The man program searches, formats, and displays the information
contained in the man page system. The man pages are divided into
chapters numbered 1 through 9.
Commands that can be executed from the command line
System calls (functions provided by the kernel)
Library functions (provided by system libraries)
Devices (on Unix-like systems, these are special files, usually placed in the /dev/ directory)
Configuration files (formats and conventions)
Games
Sets of macros and standards
System administration commands
Kernel routines
With the -a parameter, man will display all pages with the given
name in all chapters, one after the other, as in:
man -a socket
The chapter number can be used to force man to display the page from
a particular chapter.
man 7 socket
whatis    : Provides a one-line description of the commands.
man -f    : generates the same result as typing whatis.
man -k    : generates the same result as typing apropos.
If we do not know the names of the commands. We can use
aproposcommand, which searches manual pages (or more specifically their short descriptions) for any keywords provided.The
aproposcommand then returns a list of manual pages whose summary mentions the requested keywords along with the one-line summary from the manual page.
Example:
$ apropos "copy file"
cp (1)               - copy files and directories
cpio (1)             - copy files to and from archives
git-checkout-index (1) - Copy files from the index to the working tree
install (1)          - copy files and set attributes
ntfscp (8)           - copy file to an NTFS volume.
GNU Info
Typing
infowith no arguments in a terminal window displays an index of available topics. The user can browse through the topic list using the regular movement keys: arrows, Page Up, and Page Down.Help for a particular topic can be viewed by typing
info <topic name>. The system then searches for the topic in all available info files.The topic currently viewed on an info page is called a node. Basic keystrokes for moving between nodes are
n(Go to the next node),p(Go to the previous node),u(move one node up in the index).
Nodes are essentially sections and subsections in the documentation. The user can move between nodes or view each node sequentially. Each node may contain menus and linked subtopics or items.
We can also use
pinfoto reach the documentation.
help
Most commands have an available short description which can be viewed
using the --help or the -h option along with the command or
application.
To view a synopsis of these built-in commands, the user can type
help
help
help dirs
Graphical Help System
GNOME:
gnome-helporyelpKDE:
khelpcenter
Package Documentation
Linux documentation is also available as part of the package management system. Usually, this documentation is directly pulled from the upstream source code, but it can also contain information about how the distribution packaged and set up the software.
Such information is placed under the /usr/share/doc directory,
grouped in subdirectories named after each package, perhaps including
the version number in the name.
If the filename extension is of .txt.gz, it can be read using
zcat filename.txt.gz
Locating Applications
which     : find out exactly where the program resides on the filesystem.
whereis   : locate the binary, source, and manual page files for a command.
Exploring Filesystem and Directories
cd
pwd        : Displays the present working directory
cd ~ or cd : Change to your home directory (shortcut name is ~ (tilde))
cd ..      : Change to parent directory (..)
cd -       : Change to previous directory (- (minus))
The cd command remembers the last directory and allows it to reach
there with cd -. For remembering more than just the previous
directory visited,
use
pushdto change the directory instead ofcd; this pushes the starting directory onto a list.using
popdwill then send back to those directories, walking in reverse order (the most recent directory will be the first one retrieved withpopd).The list of directories is displayed with the
dirscommand.
tree
tree      : get a bird's-eye view of the filesystem tree.
  -d      : Use tree -d to view just the directories and to suppress listing file names.
ls
ls     : list files
  -F   : append indicator (one of */=>@|) to entries
find .can also be used to list the files in the current directory iflsis somehow blocked in restricted shells.
ls showing full path
ls -R /path | awk '/:$/&&f{s=$0;f=0} /:$/&&!f{sub(/:$/,"");s=$0;f=1;next} NF&&f{ print s"/"$0 }'
Creating and deleting files and directories
mv      : Rename a file, directory.
rm      : Remove a file.
rm -f   : Forcefully remove a file.
rm -i   : Interactively remove a file.
rm -rf  : Remove a directory and all of its contents recursively.
mkdir   : mkdir is used to create a directory
rmdir   : Removing a directory. The directory must be empty or the command will fail.
Creating a simple file
The editor command starts a text editor (such as Vi or Nano) and allows creating, modifying, and reading text files.
echo
echo can be used to display a string on standard output (i.e. the
terminal) or to place in a new file (using the > operator) or append
to an already existing file (using the >> operator).
echo string
The -e option, along with the following switches, is used to enable
special character sequences, such as the newline character or horizontal
tab.
\n  represents newline
\t  represents a horizontal tab.
echo is handy for viewing the values of environment variables
(built-in shell variables). For example, echo $USER will print
the name of the user who has logged into the current terminal.
If a file needs to be created without using an editor, there are two standard ways to create one from the command line and fill it with content.
The first is to use echo repeatedly:
echo line one > myfile
echo line two >> myfile
echo line three >> myfile
cat
The second way is to use cat combined with redirection:
cat << EOF > myfile
> line one
> line two
> line three
> EOF
Editing text files using Vi
Typing
vimtutorlaunches a short but very comprehensive tutorial for those who want to learn their firstvicommands.A binary visual editor (bvi) can be used to binary files.
Open file with vi
vi <filename> - Open a file to edit in Vi editor.
Vi Modes
Three modes
Command,
Insert, and
line.
Command Mode
By default, vi starts in command mode. Each key is an editor
command. Keyboard strokes are interpreted as commands that can modify
file contents.
Cursor Positions
h,l,j,k        - Move left, right, down, up
w              - Move to the start of the next word.
e              - Move to the end of the word.
b              - Move to the beginning of the word.
3w             - 3w is similar to pressing w 3 times, moves to the start of the third word.
30i-'EscKey'   - 30(insert>-(EscapeKey> : Inserts 30 - at once.
f              - find and move to the next (or previous) occurrence of a character. fo find next o.
3fo            - find the third occurrence of o
%              - In the text that is structured with parentheses or brackets, ( or { or [, use % to jump to the matching parenthesis or bracket.
0 (Zero)       - Reach beginning of the line
$              - Reach end of the line.
-              - Find the next occurrence of the word under the cursor
#              - Find the previous occurrence of the word under the cursor
gg             - Reach the beginning of the file
H              - Reach the beginning of the file
L              - Reach the end of the file
G              - Reach the end of the file
30G            - Reach the 30th line in the file
.              - Repeat the last command
z=             - If the cursor is on the word (highlighted with spell check), vim will suggest a list of alternatives that it thinks may be correct.
Searching text in vi
/text          - Search for the text. Utilize n, N for next and previous occurrences.
?text          - Search backward for pattern
Working with text in vi
o              - Insert a new line below the cursor
O              - Insert a new line above the cursor
x              - Delete the character
r              - replace the character with the next key pressed.
cw             - change the current word (puts the vi in insert mode)
dw             - Delete the current word.
dd             - Delete the current line.
d$             - Delete the text from where your cursor is to the end of the line.
dnd            - Delete n lines.
yy             - Yank or copy the current line.
y$, yny        - Similar to delete lines.
p              - Paste the line in the buffer into text after the currentline.
u              -
Insert Mode
Type i or a to switch to Insert mode from Command mode. Insert
mode is used to enter (insert) text into a file. Insert mode is
indicated by an ? INSERT ? indicator at the bottom of the screen.
Press Esc to exit Insert mode and return to Command mode.
Line Mode
Type : to switch to the Line mode from Command mode. Each key is an
external command, including writing the file contents to disk or
exiting.
Press Esc to exit Line mode and return to Command mode.
:q                          - Quit.
:q!                         - Quit even modifications have not been saved
:w                          - write to the file
:w filename                 - write out to the filename
:w! filename                - overwrite filename
:x or :wq                   - Save and close.
:syntax on                  - Turn on Syntax highlighting for C programming and other languages.
:history                    - Shows the history of the commands executed
:set number                 - Turn on the line numbers.
:set nonumber               - Turn off the line numbers.
:set spell spelllang=en_us  - Turn spell checking on with spell language as "en_us"
:set nospell                - Turn spell checking off
:set list                   - If 'list' is on, whitespace characters are made visible. The default displays "^I" for each tab, and "$" at each EOL (end of line, so trailing whitespace can be seen)
:u                          - Undo one change.
:%!xxd                      - to turn it into a hex-editor.
:%!xxd -r                   - to go back to normal mode (from hexedit mode)
:%!fmt                      - format the text using the fmt command
Using external commands in vi
:!{cmd} - Run the command without exiting the vim. {cmd} can be whoami without external brackets.
Vi Configuration Files
Two configurations files which are important:
.vimrc
It contains optional runtime configuration settings to initialize
vim when it starts. Example: If you want vim to have syntax on
and line numbers on, whenever you open vi, enter syntax on and
set number in this file.
##Sample contents of .vimrc

syntax on
set number
A good details about various options which can be set in vimrc can be found at A Good Vimrc
.viminfo
viminfo file stores command-line, search string, input-line history,
and other stuff. Useful if you want to find out what the user has been
doing in vi.
Both files are present in the user home directory.
Replace text in Vi
:s/test/learn     - would replace test to learn in current line but only first instance.
:s/test/learn/g   - would replace test to learn in current line all the instance.
:s/test/learn/gi  - would replace test (all cases) to learn in current line all the instance.
:%s/test/learn/gi - would replace test to learn in the file (all lines)
Other Info
Vim Awesome provides Awesome VIM plugins from across the universe. A few good one are
The NERD tree : Tree explorer plugin for vim
:NERDTreeToggle : Toggle the NERD Tree
:NERDTreeFocus  : Set the focus to NerdTree
Syntastic : Syntax checking hacks for vim
SyntasticCheck - Check for the possible syntax issuesYoucompleteme : Code-completion engine for Vim
fzf : Bundle of fzf-based commands and mappings
GFiles [OPTS] :    Git files (git ls-files)
GFiles?       :    Git files (git status)
History       :    v:oldfiles and open buffers
History:      :    Command history
History/      :    Search history
Snippets      :    Snippets (UltiSnips)
Commits       :    Git commits (requires fugitive. vim)
BCommits      :    Git commits for the current buffer
Commands      :    Commands
UltiSnips The ultimate snippet solution for Vim
Tabular : Vim script for text filtering and alignment
Select the text which you want to align in the visual mode (Do make sure that the cursor is also at the same position as visual)
:Tabularize /{pattern to be aligned}
Utilize Vundle, the plugin manager for vim
:PluginList       - lists configured plugins
:PluginInstall    - installs plugins; append `!` to update or  just:PluginUpdate
:PluginSearch foo - searches for foo; append `!` to refresh local cache
:PluginClean      - confirms removal of unused plugins; append `!` to    auto-approve removal
Manipulating Text
cut - remove sections from each line of files
cut OPTION... [FILE]...
 -d        : use DELIM instead of TAB for field delimiter.
 -f        : select only these fields.
sed
sed (stream editor) is used to modify the contents of a file or
input stream, usually placing the contents into a new file or output
stream.
Data from an input source/file (or stream) is taken and moved to a working space. The entire list of operations/modifications is applied over the data in the working space, and the final contents are moved to the standard output space (or stream).
sed -e command <filename>
Specify editing commands at the command line, operate on file and put the output on standard out (e.g. the terminal)
sed -f scriptfile <filename>           : Specify a scriptfile containing sed commands, operate on file, and put output on standard out
sed s/pattern/replace_string/ file     : Substitute first string occurrence in every line
sed s/pattern/replace_string/g file    : Substitute all string occurrences in every line
sed 1,3s/pattern/replace_string/g file : Substitute all string occurrences in a range of lines
sed -i s/pattern/replace_string/g file : Save changes for string substitution in the same file
Example: To convert 01/02/… to JAN/FEB/…
sed -e 's/01/JAN/' -e 's/02/FEB/' -e 's/03/MAR/' -e 's/04/APR/' -e 's/05/MAY/' \
    -e 's/06/JUN/' -e 's/07/JUL/' -e 's/08/AUG/' -e 's/09/SEP/' -e 's/10/OCT/' \
    -e 's/11/NOV/' -e 's/12/DEC/'
Example: Search for all instances of the user command interpreter
(shell) equal to /sbin/nologin in /etc/passwd and replace them
with /bin/bash.
To get output on standard out (terminal screen):
sed s/'\/sbin\/nologin'/'\/bin\/bash'/g /etc/passwd
or to direct to a file:
sed s/'\/sbin\/nologin'/'\/bin\/bash'/g /etc/passwd > passwd_new
Note that this is painful and obscure because we are trying to use the forward-slash ( / ) as both a string and a delimiter between fields. One can do instead:
sed s:'/sbin/nologin':'/bin/bash':g /etc/passwd
where we have used the colon ( : ) as the delimiter instead. (You
are free to choose your delimiting character!) In fact, when doing this,
we do not even need the single quotes:
bitvijays/tmp> sed s:/sbin/nologin:/bin/bash:g /etc/passwd
Example
sed -i '/^$/d' : is used to delete empty lines in a file using the -i option to edit the file in-place.
awk
awk is an interpreted programming language, typically used as a data
extraction and reporting tool. awk is used to extract and then print
specific contents of a file and is often used to construct reports.
awk `command'  file      : Specify a command directly at the command line
awk -f scriptfile file   : Specify a file that contains the script to be executed
The input file is read one line at a time, and, for each line, awk
matches the given pattern in the given order and performs the requested
action. The -F option allows specifying a particular field separator
character. For example, the /etc/passwd file uses : to separate
the fields, so the -F: option is used with the /etc/passwd file.
The command/action in awk needs to be surrounded with apostrophes (or
single-quote (‘)). awk can be used as follows:
awk '{ print $0 }' /etc/passwd        : Print entire file
awk -F: '{ print $1 }' /etc/passwd    : Print first field (column) of every line, separated by a space
awk -F: '{ print $1 $7 }' /etc/passwd : Print first and seventh field of every line
Awk converting to normal output to csv
A B --> "A","B"
awk '{print "\"" $1 "\",\"" $2"\""}'
sort
According to a sort key, sort is used to rearrange the lines of a
text file, in either ascending or descending order. It can also sort
with respect to particular fields (columns) in a file. The default sort
key is the order of the ASCII characters (i.e., essentially
alphabetically).
sort <filename>        : Sort the lines in the specified file according to the characters at the beginning of each line
cat file1 file2 | sort : Combine the two files, then sort the lines and display the output on the terminal
sort -r <filename>     : Sort the lines in reverse order
sort -k 3 <filename>   : Sort the lines by the 3rd field on each line instead of the beginning
When used with the -u option, sort checks for unique values after
sorting the records (lines). It is equivalent to running uniq on the
output of sort.
uniq
uniq removes duplicate consecutive lines in a text file and helps
simplify the text display.
Because uniq requires that the duplicate entries must be
consecutive, one often runs sort first and then pipes the output
into uniq; if sort is used with the -u option, it can do all
this in one step.
To remove duplicate entries from multiple files at once, use the following command:
sort file1 file2 | uniq > file3
or
sort -u file1 file2 > file3
To count the number of duplicate entries, use the following command:
uniq -c filename
paste
paste can combine fields (such as name or phone number) from
different files and combine lines from multiple files. For example,
paste can combine line 1 from file1 with line 1 of file2, line 2
from file1 with line two of file2, and so on.
Let’s assume there are two files; one contains the full name of all employees, and another contains their phone numbers and Employee IDs. We want to create a new file that contains all the data listed in three columns: name, employee ID, and phone number.
paste can be used to create a single file containing all three
columns. The different columns are identified based on delimiters
(spacing used to separate two fields). For example, delimiters can be a
blank space, a tab, or an Enter.
paste accepts the following options:
-d delimiters : specify a list of delimiters to be used instead of tabs for separating consecutive values on a single line. Each delimiter is used in turn; when the list has been exhausted, paste begins again at the first delimiter.
-s            :  causes paste to append the data in series rather than in parallel; that is, in a horizontal rather than vertical fashion.
To paste contents from two files:
paste file1 file2
The syntax to use a different delimiter is as follows:
paste -d, file1 file2
Common delimiters are space, tab, |, comma, etc.
join
join combines lines from two files based on a common field. It works
only if files share a common field.
Suppose we have two files with some similar columns. We have saved employees’ phone numbers in two files, one with their first name and the other with their last name. We want to combine the files without repeating the data of common columns. How do we achieve this?
The above task can be achieved using join, which is essentially an
enhanced version of paste. It first checks whether the files share
common fields, such as names or phone numbers, and then joins the lines
in two files based on a common field.
To combine two files on a common field,
join file1 file2
split
split is used to break up (or split) a file into equal-sized
segments for easier viewing and manipulation and is generally used only
on relatively large files. By default, split breaks up a file into
1000-line parts. The original file remains unchanged, and a set of new
files with the same name plus an added prefix is created. By default,
the x prefix is added.
split a file into segments:
split infile
split a file into segments using a different prefix
split infile <Prefix>
We will apply split to an American-English dictionary file of over 99,000 lines:
wc -l american-english
99171 american-english
We have used wc (word count) to report the number of lines in the
file. Then, typing:
split american-english dictionary
will split the American-English file into 100 equal-sized segments named dictionaryxx.
strings
strings is used to extract all printable character strings found in
the file or files given as arguments. It is useful in locating
human-readable content embedded in binary files.
For example, to search for the string my_string in a spreadsheet:
strings book1.xls | grep my_string
tr
tr translates characters, copies standard input to standard output,
and handles special characters. The tr utility is used to translate
specified characters into other characters or to delete them. The
general syntax is as follows:
tr [options] set1 [set2]
The items in the square brackets are optional.
tr abcdefghijklmnopqrstuvwxyz ABCDEFGHIJKLMNOPQRSTUVWXYZ : Convert lower case to upper case
tr '{}' '()' < inputfile > outputfile                    : Translate braces into parenthesis
echo "This is for testing" | tr [:space:] '\t'           : Translate white-space to tabs
echo "This   is   for    testing" | tr -s [:space:]      : squeeze repetition of characters using -s
echo "the geek stuff" | tr -d 't'                        : Delete specified characters using -d option
echo "my username is 432234" | tr -cd [:digit:]          : Complement the sets using -c option
tr -cd [:print:] < file.txt                              : Remove all non-printable character from a file
tr -s '\n' ' ' < file.txt                                : Join all the lines in a file into a single line
tee
tee takes the output from the command, and one stream is displayed
on the standard output, and the other is saved to a file.
For example, to list the contents of a directory on the screen and save the output to a file.
ls -l | tee newfile
cat newfile will then display the output of ls –l.
wc
wc (word count) counts the number of lines, words, and characters in
a file or list of files.
wc
-l : Displays the number of lines
-c : Displays the number of bytes
-w : Displays the number of words
cut
cut is used for manipulating column-based files and is designed to
extract specific columns. The default column separator is the tab
character. A different delimiter can be given as a command option.
For example, to display the third column delimited by a blank space.
ls -l | cut -d " " -f3
alias
We can create customized commands or modify the behavior of already
existing ones by creating aliases. These aliases are placed in
~/.bashrc file, so they are available to any command shells.
unalias removes an alias.
Typing alias with no arguments will list currently defined aliases.
Viewing Files
echo
echo can be used to read files.
echo *: List the current folder files.echo */*: List all the files in the next sub-folders level.echo .*: List hidden files.echocan also be used to read filesecho "$( < filename.txt )"
cat
cat, short for concatenate, is used to read, print, and combine
files.
cat : Used for viewing files that are not very long; it does not provide any scroll-back.
When
catsees the string-as a filename, it treats it as a synonym forstdin.To get around this, we need to alter the string that
catsees in such a way that it still refers to a file called-.The usual way of doing this is to prefix the filename with a path
-./-, or/home/username/-.This technique is also used to get around similar issues where command-line options clash with filenames, so a file referred to as
./-edoes not appear as the-ecommand-line option to a program.
The
taccommand (catspelled backward) prints the lines of a file in reverse order. Each line remains the same, but the order of lines is inverted. The syntax oftacis the same as for thecat, as in:tac file tac file1 file2 > newfile
xxd
Make a hexdump or do the reverse.
-g bytes      : number of octets per group in normal output. Default 2
-l len        : stop after len octets.
-s [+][-]seek : start at seek bytes abs. (or +: rel.) infile offset.
hexdump
Display file contents in hexadecimal, decimal, octal, or ascii.
-s, --skip <offset> skip offset bytes from the beginning
View large files
less
less can be used to view the contents of a large file requiring
scrolling up and down page by page, without the system having to place
the entire file in memory before starting. This is much faster than
using a text editor.
head
head reads the first few lines of each named file (10 by default)
and displays it on standard output. The number of lines to read can be
provided in an option.
For example, if we need to print the first 5 lines from grub.cfg,
use the following command:
head -n 5 grub.cfg
head -5 grub.cfg
tac       : used to look at a file backward, starting with the last line.
less      : print information one per page.
more      : prints information one per page.
head      : prints first 10 lines
tail      : prints last 10 lines.
tail
tail prints the last few lines of each named file and displays it on
standard output. By default, it shows the last 10 lines. The number of
lines can be provided in an option. tail is handy when
troubleshooting any issue using log files as the user probably wants to
see the most recent output lines.
For example, to display the last 15 lines of somefile.log, use the following command:
tail -n 15 somefile.log
tail -15 somefile.log
To continually monitor new output in a growing log file:
tail -f somefile.log
Viewing compressed files
Reading compressed files for many commonly-used file and text
manipulation programs requires different associated utilities having the
letter “z” prefixed to their name. For example, we have utility programs
such as zcat, zless, zdiff and zgrep.
Here is a table listing some z family commands for gzip
compression method:
zcat compressed-file.txt.gz
zless somefile.gz
zmore somefile.gz               : To page through a compressed file
zgrep -i less somefile.gz       : To search inside a compressed file
zdiff file1.txt.gz file2.txt.gz : To compare two compressed files
There is bzcat and bzless associated with bzip2 compression
method, and xzcat and xzless associated with xz compression
method.
Searching Files
locate
find files by name. locate utilizes a database created by
updatedb. The database is automatically once a day and can be
updated manually by running updatedb.
Examples:
locate yum  : locate a file named yum
locate .doc : locate files with .doc extension
find
find recurses down the filesystem tree from any particular directory
(or set of directories) and locates files that match specified
conditions. The default pathname is always the present working
directory.
When no arguments are provided,
findlists all files in the current directory and all of its subdirectories.findis being able to run commands on the files that match your search criteria using-execoption.
find / -name somename

-user       : File is owned by user uname (numeric user ID allowed).
-group      : File belongs to group gname (numeric group ID allowed).
-size       : File uses n units of space. c/k/M/G: bytes/Kilobytes/Megabytes/Gigabytes.
-name       : Base  of  filename
-type       : d for directory, f for file
-ctime X    : is when the inode metadata (i.e., file ownership, permissions, etc.) last changed; it is often, but not necessarily, when the file was first created.
-atime X    : search for accessed/last read
-mtime X    : modified/last written. The X is the number of days and can be expressed as either a number (n) that means exactly that value, +n, which means greater than that number, or -n, which means less than that number. Similar options for times in minutes (as in -cmin, -amin, and -mmin)
-size Y     : find files based on size. Size is in 512-byte blocks, by default; We can also specify bytes (c), kilobytes (k), megabytes (M), gigabytes (G). Example +10M
Example: Remove all files that end with .swp
find -name "*.swp" -exec rm {} ;
The {} (squiggly brackets) is a placeholder that will be filled with
all the file names that result from the find expression, and the
preceding command will be run on each one individually.
The command needs to be ended with either ‘;’ (including the single-quotes) or “;”.
We can also use the -ok option, which behaves the same as -exec,
except that find will prompt for permission before executing the
command (a good way to test your results before blindly executing any
potentially dangerous commands).
Example: Delete empty file and directories
find -empty -type d -delete
find -empty -type f -delete
Find each file in the current directory and tell its type and grep JPEG files.
find . -type f -exec file {} + | grep JPEG
Searching for text using Global Regular Expression Print (grep)
grep searches text files and data streams for patterns and can be
used with regular expressions.
Ways to provide input to grep
search a given file or files on a system (including a recursive search through sub-folders).
grep bitvijays /etc/passwdGrep also accepts inputs (usually via a pipe) from another command or series of commands.
cat /etc/passwd | grep bitvijays
Syntax
grep [options] [regexp] [filename]

    -i, --ignore-case        : 'it DoesNt MatTTer WhaT thE CAse Is'
    -v, --invert-match       : 'everything , BUT that text'
    -A NUM                   : Print NUM lines of trailing context after matching lines.
    -B NUM                   : Print NUM lines of trailing context before matching lines.
    -C NUM                   : Print additional (leading and trailing) context lines before and after the match.
    -a, --text               : Process a binary file as if it were text; this is equivalent to the --binary-files=text option.
    -w                       : Whole-word search
    -L --files-without-match : which outputs the names of files that do NOT contain matches for your search pattern.
    -l --files-with-matches  : which prints out (only) the names of files that do contain matches for your search pattern.

    -H (pattern> filename    : Print the filename for each match.
     example: grep -H 'a' testfile
     testfile:carry out few cyber-crime investigations

     Now, let's run the search a bit differently:
     cat testfile | grep -H 'a'
    (standard input):carry out few cyber-crime investigations
Using regular expressions
Note
Regular expression should be enclosed in single quotation marks or double quotes (allows environment variables to be used), to prevent the shell (Bash or others) from trying to interpret and expand the expression before launching the grep process.
grep 'v.r' testfile
thank you very much
In the search above, . is used to match any single character -
matches “ver” in “very”.
A regular expression may be followed by one of several repetition operators:
The period (
.) matches any single character.?means that the preceding item is optional, and if found, will be matched at the most, once.-means that grep will match the preceding item zero or more times.+means that grep will match the preceding item one or more times.Matching with times
{n}means the preceding item is matched exactly n times,{n,}means the item is matched n or more times.{n,m}means that the preceding item is matched at least n times, but not more than m times.{,m}means that the preceding item is matched, at the most, m times.
Todo
Examples of Matching with times
grep -e / grep -E
Matcher Selection
 -E, --extended-regexp        :  Interpret PATTERN as an extended regular expression.

Matching Control
 -e PATTERN, --regexp=PATTERN :  Use  PATTERN  as the pattern. If this option is used multiple times or is combined with the -f (--file) option, search for all patterns given. This option can be used to protect a pattern beginning with “-”.
Example:
grep -E '^[0-9a-zA-Z]{30,}'
Grep anything that starts with a string containing characters from
0-9,a-z or A-Z and has matched 30 or more times.
Search a specific string
Scan files for a text present in them.
Find a way to scan the entire Linux system for all files containing a specific string of text. Just to clarify, we are looking for text within the file, not in the file name.
grep -rnw -e "pattern" --include={-.c,-.h} --exclude=-.o 'directory'
  -r                    : search recursively
  -n                    : print line number
  -w                    : match the whole word.
  --include={-.c,-.h}   : Only search through the files which have .c or .h extensions.
  --exclude=-.o         : Exclude searching in files with .o extensions.
Note
--exclude or --include parameter could be used for efficient searching.
Line and word anchors
The
^anchor specifies that the pattern following it should be at the start of the line:grep '^th' testfile this
The
$anchor specifies that the pattern before it should be at the end of the line.grep 'i$' testfile Hi
The operator
<anchors the pattern to the start of a word.grep '\<fe' testfile carry out few cyber-crime investigations
>anchors the pattern to the end of a word.grep 'le\>' testfile is test file
The
b(word boundary) anchor can be used in place of<and>to signify the beginning or end of a word:grep -e '\binve' testfile carry out few cyber-crime investigations
Shell expansions - input to Grep
If we don’t single-quote the pattern passed to Grep, the shell could
perform shell expansion on the pattern and feed a changed pattern to
grep.
grep "$HOME" /etc/passwd
root:x:0:0:root:/root:/bin/bash
We used double quotes to make the Bash shell replace the environment
variable $HOME with the variable’s actual value (in this case,
/root). Thus, grep searches the /etc/passwd file for the
text /root, yielding the two lines that match.
grep `whoami` /etc/passwd
root:x:0:0:root:/root:/bin/bash
Here, back-tick expansion is done by the shell, replacing whoami
with the user name (root) that is returned by the whoami command.
Compressing Files
gzip, bzip2, xz and zip are used to compress files.
tar allows you to create or extract files from an archive file,
often called a tarball. tar can optionally compress while creating
the archive, and decompress while extracting its contents.
gzip: The most frequently used Linux compression utility.bzip2: Produces files significantly smaller than those produced bygzip.xz: The most space-efficient compression utility used in Linux.zip: required to examine and decompress archives from other OSs.tar: thetarutility is often used to group files in an archive and then compress the whole archive at once.
tar
Archiving utility
tar
 -c                          : create archive
 -t                          : list the content of the file
 -x                          : extract the files
 -j                          : bzip2 format
 -z                          : gzip format
tar xvf mydir.tar            : Extract all the files in mydir.tar into the mydir directory
tar xvf mydir.tar.gz         : Extract all the files in mydir.tar.gz into the mydir directory
tar zcvf mydir.tar.gz mydir  : Create the archive and compress with gzip
tar jcvf mydir.tar.bz2 mydir : Create the archive and compress with bz2
tar Jcvf mydir.tar.xz mydir  : Create the archive and compress with xz
gzip
gzip *            : Compresses all files in the current directory; each file is compressed and renamed with a .gz extension
gzip -r projectX  : Compresses all files in the projectX directory, along with all files in all of the directories under projectX
gunzip foo        : De-compresses foo found in the file foo.gz. Under the hood, the gunzip command is the same as gzip –d
bzip
bzip2 *       : Compresses all of the files in the current directory and replaces each file with a file renamed with a .bz2 extension
bunzip2 *.bz2 : Decompresses all of the files with an extension of .bz2 in the current directory. Under the hood, bunzip2 is the same as calling bzip2 -d
xz
xz *                              : Compresses all of the files in the current directory and replaces each file with a .xz extension
xz foo                            : Compresses foo into foo.xz using the default compression level (-6), and removes foo if compression succeeds
xz -dk bar.xz                     : Decompresses bar.xz into bar and does not remove bar.xz even if decompression is successful
xz -dcf a.txt b.txt.xz > abcd.txt : Decompresses a mix of compressed and uncompressed files to standard output, using a single command
xz -d *.xz                        : Decompresses the files compressed using xz
zip
zip backup *        : Compresses all files in the current directory and places them in the backup.zip
zip -r backup.zip ~ : Archives your login directory (~) and all files and directories under it in backup.zip
unzip backup.zip    : Extracts all files in backup.zip and places them in the current directory
Backing up data
Backing up the date can be done in multiple ways. A simple way is by
simply copying with cp or using more robust rsync. Both can be
used to synchronize entire directory trees. However, rsync is more
efficient, as it checks if the file being copied already exists. If the
file exists and there is no change in size or modification time,
rsync will avoid an unnecessary copy and save time. Furthermore,
because rsync copies only the parts of files that have changed, it
can be very fast.
cp
cp can only copy files to and from destinations on the local machine
(unless copying to or from a filesystem mounted using NFS).
cp (SOURCE> (DIRECTORY>
  -r        : recursive.
  -a        : similar to preserve,
  -p        : preserve
  -v        : verbose.
rsync
rsync can be used to copy files from one machine to another.
Locations are designated in the target:path form, where target can
be in the form of someone@host. The someone@ part is optional
and used if the remote user is different from the local user.
rsync is very efficient when recursively copying one directory tree
to another, because only the differences are transmitted over the
network. One often synchronizes the destination directory tree with the
origin, using the -r option to recursively walk down the directory
tree copying all files and directories below the one listed as the
source.
For example, a useful way to back up a project directory might be to use the following command:
rsync -r project-X someone@host:archives/project-X
Note
rsync can be very destructive! Accidental misuse can do a lot of harm to data and programs by inadvertently copying changes to where they are not wanted. Take care to specify the correct options and paths. It is recommended that first test the rsync command using the -dry-run option to ensure that it provides the desired results.
To use rsync at the command prompt, type rsync sourcefile destinationfile, where either file can be on the local machine or a networked machine; rsync will copy the contents of sourcefile to destinationfile.
rsync --progress -avrxH --delete sourcedir destdir
Comparing files with diff
diff : compare files line by line.
-c Provides a listing of differences that include three lines of context before and after the lines differing in content
-r Used to recursively compare subdirectories, as well as the current directory
-i Ignore the case of letters
-w Ignore differences in spaces and tabs (white space)
-q Be quiet: only report if files are different without listing the differences
To compare two files, at the command prompt, type
diff [options] <filename1> <filename2>. diff is meant to be used for
text files; for binary files, one can use cmp.
patch is a useful tool in Linux. Many modifications to source code
and configuration files are distributed with patch files. They contain
the deltas or changes from an old version of a file to the new version.
A patch file contains the deltas (changes) required to update an
older version of a file to the new one. The patch files are actually
produced by running diff with the correct options:
diff -Nur originalfile newfile > patchfile
To apply a patch, the user can just do either of the two methods below:
patch -p1 < patchfile
patch originalfile patchfile
The first usage is more common. It is often used to apply changes to an
entire directory tree, rather than just one file, as in the second
example. To understand the use of the -p1 option and many others,
see the man page for the patch.
Identifying Users
whoami : Identify the current user
who    : list the currently logged-on users
who -a : provide more detailed information
Builtins
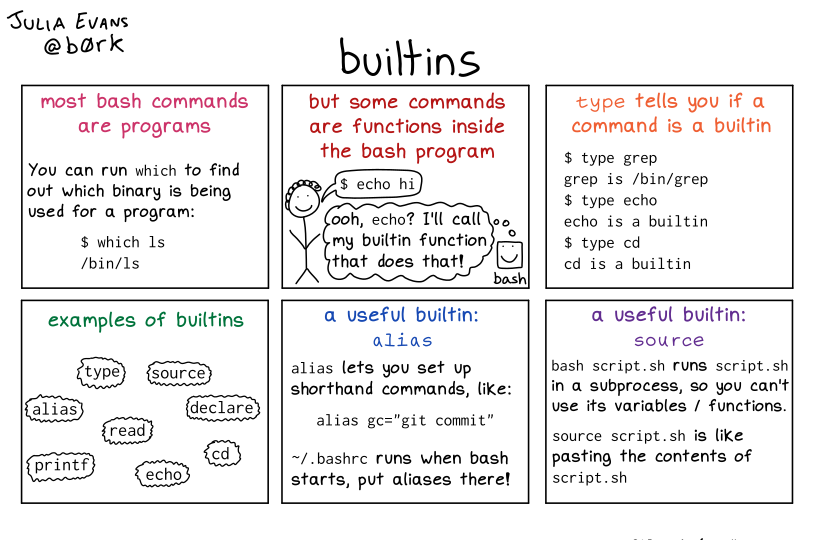
Builtins
Other commands
nm-applet : a applet for the network manager.
wc        : print newline, word, and byte counts for each file.
 -c       : print the bytes count.
 -l       : print the lines count.
 -w       : print the word count.
sort      : sort lines of text files.
cal       : Display calendar
date      : Display date. Date command provides multiples options for displaying day and time, very helpful in creating backups with name having time and date.
tr        : Converts from smaller to uppercase. tr stands for translate.
 -d       : delete characters in the text.
tee       : saves output in file as well as forward it.
touch     : Create zero byte files, mainly used for changing the timestamps of the file.
make      : If your program source file name is test.c/cpp, then you can directly write make test, this would compile the test.c/cpp program. Remember this it's a faster way.
stat      : View detailed information about a file, including its name, size, last modified date and permissions.
uniq      : Report or omit repeated lines.
  -c      : prefix lines by the number of occurrences. (--count)
free      : displays information on memory
df        : reports on the available disk space on each of the disks mounted in the file system
id        : displays the identity of the user running the session along with the list of groups they belong to
journalctl: Systemd's journal also stores multiple logs (stdout/stderr output of services, syslog messages, kernel logs)
  -r      : reverse the order so that newer messages are shown first
  -f      : continuously print new log entries as they are appended to its database
  -u ssh.service: limit the messages to those emitted by a specific systemd unit
Regular Expressions and search patterns
Regular expressions are text strings used for matching a specific
pattern, or to search for a particular location, such as the start or
end of a line or a word. Regular expressions can contain both normal
characters or so-called meta-characters, such as * and $.
Many text editors and utilities such as vi, sed, awk,
find and grep work extensively with regular expressions.
.(dot) : Match any single character
a|z    : Match a or z
$      : Match end of string
^      : Match beginning of string
*      : Match preceding item 0 or more times
For example, consider the following sentence:
the quick brown fox jumped over the lazy dog.
a..   : matches azy
b.|j. : matches both br and ju
..$   : matches og
l.*   : matches lazy dog
l.*y  : matches lazy
the.* : matches the whole sentence
Environment Variables
An environment variable is a character string that contains data used by one or more applications. The built-in shell variables can be customized to suit requirements.
Environment variables allow storage of global settings for the shell or various other programs. They are contextual but inheritable. For example,
Each process has its own set of environment variables (contextual).
Shells, like login shells, can declare variables, which will be passed down to other programs they execute (inheritable).
Variables can be defined system-wide in
/etc/profileor per-user in~/.profilebut variables that are not specific to command line interpreters can be put in/etc/environment, since those variables will be injected into all user sessions.
Bash Environment Variables
Some environment variables are given preset values by the system (which can usually be overridden). In contrast, the user sets others directly, either at the command line or within the startup and other scripts.
There are several ways to view the values of currently set environment variables, such as
set,env, orexport.By default, variables created within a script are only available to the current shell; child processes (sub-shells) will not have access to values that have been set or modified. Allowing child processes to see the values requires the use of the
exportcommand.echo $SHELL : Show the value of a specific variable export VARIABLE=value (or VARIABLE=value; export VARIABLE) : Export a new variable value
For adding a variable permanently, Edit
~/.bashrcand add the lineexport VARIABLE=value. To use it,source ~/.bashrcor just. ~/.bashrc(dot~/.bashrc); or just start a new shellbash
Home
HOME is an environment variable representing the home (or login)
directory of the user. cd without arguments will change the current
working directory to the value of HOME. Note the tilde character
(~) is often used as an abbreviation for $HOME. Thus,
cd $HOME and cd ~ are completely equivalent statements.
Path
PATH is an ordered list of directories (the path) scanned when a command
is given to find the appropriate program or script to run. Each
directory in the path is separated by colons (:). A null (empty)
directory name (or ./) indicates the current directory at any given
time.
:path1:path2
path1::path2
In the example :path1:path2, there is a null directory before the
first colon (:). Similarly, for path1::path2 there is a null
directory between path1 and path2.
To prefix a private bin directory to your path:
$ export PATH=$HOME/bin:$PATH
$ echo $PATH
/home/student/bin:/usr/local/bin:/usr/bin:/bin/usr
SHELL
The environment variable SHELL points to the user’s default command
shell (the program that is handling whatever you type in a command
window, usually bash) and contains the full pathname to the shell:
echo $SHELL
/bin/bash
PS1 & Command Line Prompt
The PS1 variable is the character string that is displayed as the
prompt on the command line.
The following special characters can be included in PS1:
\u - User name
\h - Hostname
\w - Current working directory
\! - History number of this command
\d - Date
echo $PS1
\[\e]0;\u@\h: \w\a\]${debian_chroot:+($debian_chroot)}\u@\h:\w\$
Networking
The IP (Internet Protocol) address is a unique logical network address assigned to a device on a network.
IPv4 uses 32-bits for addresses, and IPv6 uses 128-bits for addresses.
Every IP address contains both a network and a host address field. There are five classes of network addresses available: A, B, C, D & E.
DNS (Domain Name System) is used for converting Internet domain and hostnames to IP addresses.
Linux Networking
ip
To view the IP address:
/sbin/ip addr show
To view the routing information:
/sbin/ip route show
ping
ping is used to check whether or not a machine attached to the
network can receive and send data; i.e. it confirms that the remote host
is online and is responding.
To check the status of the remote host:
ping <hostname>
route
A network requires the connection of many nodes. Data moves from source to destination by passing through a series of routers and potentially across multiple networks. Servers maintain routing tables containing the addresses of each node in the network. The IP routing protocols enable routers to build up a forwarding table that correlates final destinations with the next-hop addresses.
route, ip can view or change the IP routing table to add,
delete, or modify specific (static) routes to particular hosts or
networks.
Show current routing table
route -n
ip route
Add static route
route add -net address
ip route add
Delete static route
route del -net address
ip route del
traceroute
traceroute is used to inspect the route the data packet takes to
reach the destination host, making it quite useful for troubleshooting
network delays and errors.
To print the route taken by the packet to reach the network host.
traceroute <address>
wget
wget is a command-line utility that can capably handle the following
types of downloads:
Large file downloads
Recursive downloads, where a web page refers to other web pages and all are downloaded at once
Password-required downloads
Multiple file downloads.
To download a web page:
wget <url>
curl
curl allows saving the contents of a web page to a file, as does
wget.
Read a URL:
curl <URL>
curl http://bitvijays.github.io/
Get the contents of a web page and store it in a file:
curl -o saved.html http://www.mysite.com
ftp
Some command-line FTP clients are:
ftp
sftp
ncftp
yafc (Yet Another FTP Client)
ssh
Secure Shell (SSH) is a cryptographic network protocol used for secure data communication. It is also used for remote services and other secure services between two devices on the network. It is beneficial for administering systems that are not readily available to work on physically but to which remote access is available.
To login to a remote system using the same user name (currently logged
in), we can ssh remote_system. ssh then prompts for the remote
password. Users can configure the ssh to allow remote access without
typing a password each time securely.
If we want to run as another user, we can do either
ssh -l someone some_system or ssh someone@some_system.
To run a command on a remote system via SSH, we can type
ssh some_system my_command
Generating new SSH host keys
Each SSH server has its own cryptographic keys; they are named “SSH host keys” and are stored in
/etc/ssh/ssh_host_*.They must be kept private to ensure confidentiality and must not be shared by multiple machines.
If we install the system by copying a full disk image (instead of using debian-installer such as ARM images), the image might contain pre-generated SSH host keys, we should replace with newly-generated keys. The image probably also comes with a default user password that might need to reset.
# passwd
[...]
# rm /etc/ssh/ssh_host_*
# dpkg-reconfigure openssh-server
# systemctl restart ssh
scp
Move files securely using Secure Copy (scp) between two networked hosts.
scp uses the SSH protocol for transferring data.
To copy a local file to a remote system.
scp <localfile> <user@remotesystem>:/home/user/
Other tools
ethtool : Queries network interfaces and can also set various parameters such as the speed
netstat : Displays all active connections and routing tables. Useful for monitoring performance and troubleshooting
nmap    : Scans open ports on a network. Important for security analysis
tcpdump : Dumps network traffic for analysis
iptraf  : Monitors network traffic in text mode
mtr     : Combines the functionality of ping and traceroute and gives a continuously updated display
dig     : Tests DNS workings. A good replacement for host and nslookup
Setting up IP address
ifupdown
We can configure the network
ifupdownpackage, which includes theifupandifdowntools.The tools read definitions from the
/etc/network/interfacesconfiguration file and are at the heart of the/etc/init.d/networkinginit script that configures the network at boot time.Each network device managed by
ifupdowncan be deconfigured at any time withifdownnetwork-device. We can then modify/etc/network/interfacesand bring the network back up (with the new configuration) withifup network-device.
ifupdown’s configuration file
There are two main directives:
auto network-device, which tells ifupdown to automatically configure the network interface once it is available, andiface network-device inet/inet6 typeto configure a given interface.
For example, For example, a plain DHCP configuration looks like this:
auto lo
iface lo inet loopback

auto eth0
iface eth0 inet dhcp
Note that the special configuration for the loopback device should always be present in this file. For a fixed IP address configuration, we have to provide more details such as the IP address, the network, and the IP of the gateway:
auto eth0
iface eth0 inet static
address 192.168.0.3
netmask 255.255.255.0
broadcast 192.168.0.255
network 192.168.0.0
gateway 192.168.0.1
For wireless interfaces, we must have the wpasupplicant package, which provides many wpa-* options that can be used in /etc/network/interfaces. Have a look at /usr/share/doc/wpasupplicant/README.Debian.gz for examples and explanations.
The most common options are
wpa-ssid(which defines the name of the wireless network to join) andwpa-psk(which defines the passphrase or the key protecting the network).
iface wlan0 inet dhcp
wpa-ssid HomeNetworkSSID
wpa-psk HomeNetworkPassword
systemd-networkd
We can configure
systemd-networkdby placing.networkfiles into the/etc/systemd/network/directory.Alternatively, we can use
/lib/systemd/network/for packaged files or/run/systemd/network/for files generated at run-time.The format of those files is documented in systemd.network(5).
The
[Match]section indicates the network interfaces the configuration applies to. We can specify the interface in many ways, including by media access control (MAC) address or device type.The
[Network]section defines the network configuration.
Static Configuration in /etc/systemd/network/50-static.network
[Match]
Name=enp2s0

[Network]
Address=192.168.0.15/24
Gateway=192.168.0.1
DNS=8.8.8.8
DHCP-based Configuration in /etc/systemd/network/80-dhcp.network
[Match]
Name=en*

[Network]
DHCP=yes
Note
System-networkd is disabled by default. We should enable it. It also depends on systemd-resolved for proper integration of DNS resolution, which in turn requires to replace /etc/resolv.conf with a symlink to /run/systemd/resolve/resolv.conf, which is managed by systemd-resolved.
systemctl enable systemd-networkd
systemctl enable systemd-resolved
systemctl start systemd-networkd
systemctl start systemd-resolved
ln -sf /run/systemd/resolve/resolv.conf /etc/resolv.conf
ip
netplan
ifconfig
Ping IP Address
Sometimes, we might be in strange situations where we need to ping some IP address
Windows
Powershell
CMD
Important concepts
Pipes
When commands are executed, by default, there are three standard file streams (or descriptors) always open for use:
standard input (standard in/stdin/file descriptor 0): stdin is supplied by directing input to come from a file or the output of a previous command through a pipe or from the keyboard.
standard output (standard out/stdout/file descriptor 1) and
standard error (or stderr/file descriptor 2). stderr is often redirected to an error logging file.
<         : direct input to the command.
>         : direct normal output.
2>        : direct error output.
&>        : direct all output.
|         : forward the output of the command to another.
Redirects
Special Characters
-(asterik)          : A wildcard used to represent zero or more characters in a filename. For example: ls -.txt will list all the names ending in ".txt" such as "file1.txt" and "file23.txt".
?(question mark)    : A wildcard used to represent a single character in a filename. For example ls pic?.jpg would match "pic1.jpg" and "pic2.jpg" but not "pic24.jpg" or "pic.jpg".
[](square brackets) : These are used to specify a range of values to match. For example, "[0-9]" and "[a-z]".
[!set]              : Matches any character not in the set of characters.
;(semi colon)       : Command separator can be used to run multiple commands on a single line unconditionally.
&&(double ampersand): Command separator will only run the second command if the first one is successful (does not return an error.)
||(double pipe)     : Command separator, which will only run the second command if the first command failed (had errors). Commonly used to terminate the script if an important command fails.
# (Comments)        : Lines beginning with a # (except #!) are comments and will not be executed.
Understanding Absolute and Relative Paths
There are two ways to identify paths:
Absolute pathname
An absolute pathname begins with the root directory and follows the
tree, branch by branch until it reaches the desired directory or file.
Absolute paths always start with /.
Relative pathname
A relative pathname starts from the present working directory. Relative
paths never start with /.
Multiple slashes (/) between directories and files are allowed, but
the system ignores all but one slash between elements in the pathname.
////usr//bin is valid, but seen as /usr/bin by the system.
Most of the time, it is most convenient to use relative paths, which
require less typing. Usually, we take advantage of the shortcuts
provided by: . (present directory), .. (parent directory) and
~ (your home directory).
Hard and Soft Links
Hard Links
The ln utility is used to create hard links and (with the -s
option) soft links, also known as symbolic links or symlinks.
Suppose that file hello1 already exists. A hard link, called hello2, is created with the command:
ln target newfile
ln hello1 hello2
$ ls -li hello*
3017 -rw-r--r-- 2 root root 6 Jun  3 14:40 hello1
3017 -rw-r--r-- 2 root root 6 Jun  3 14:40 hello2
The -i option to ls prints out in the first column the inode
number. This field is the same for both of these files.
Editing one of the files will change both of the files.
Deleting one of the files will only delete that particular file.
Soft Links
Soft (or Symbolic) links are created with the -s option, as in:
ln -s hello hello2

ls -lahi hello*
3017 -rw-r--r-- 1 root root 6 Jun  3 14:40 hello
4995 lrwxrwxrwx 1 root root 5 Jun  3 16:13 hello2 -> hello
Notice hello2 no longer appears to be a regular file. It points to
hello and has a different inode number.
Information
Confidentiality, Integrity, Availability
We want our information to
be read by only the right people (confidentiality).
only be changed by authorized people or processes (integrity)
be available to read and use whenever we want (availability).
Non-repudiation
Non-repudiation is about ensuring that users cannot deny knowledge of sending a message or performing some online activity at some later point in time. For example, in an online banking system, the user cannot claim that they did not send a payment to a recipient after the bank has transferred the funds to the recipient’s account.
Important File Formats
/etc/passwd
Linux uses groups for organizing users. Groups are collections of
accounts with certain shared permissions. Control of group membership is
administered through the /etc/group file, which shows a list of
groups and their members. By default, every user belongs to a default or
primary group.
Users also have one or more group IDs (gid), including a default one
which is the same as the user ID. These numbers are associated with
names through the files /etc/passwd and /etc/group. Groups are
used to establish a set of users who have common interests for the
purposes of access rights, privileges, and security considerations.
Access rights to files (and devices) are granted on the basis of the
user and the group they belong to.
The /etc/passwd file is a colon-separated file that contains the
following information:
User name
Encrypted password
User ID number (UID)
User’s group ID number (GID)
Full name of the user (GECOS)
User home directory
Login shell
root:!:0:0::/:/usr/bin/ksh
daemon:!:1:1::/etc:
bin:!:2:2::/bin:
sys:!:3:3::/usr/sys:
adm:!:4:4::/var/adm:
uucp:!:5:5::/usr/lib/uucp:
guest:!:100:100::/home/guest:
nobody:!:4294967294:4294967294::/:
lpd:!:9:4294967294::/:
lp:-:11:11::/var/spool/lp:/bin/false
invscout:-:200:1::/var/adm/invscout:/usr/bin/ksh
nuucp:-:6:5:uucp login user:/var/spool/uucppublic:/usr/sbin/uucp/uucico
paul:!:201:1::/home/paul:/usr/bin/ksh
jdoe:-:202:1:John Doe:/home/jdoe:/usr/bin/ksh
/etc/shadow
The /etc/shadow file contains password and account expiration
information for users, and looks like this:
smithj:Ep6mckrOLChF.:10063:0:99999:7:xx:
As with the /etc/passwd file, each field in the shadow file is
also separated with “:” colon characters, and are as follows:
Username, up to 8 characters. Case-sensitive, usually all lowercase. A direct match to the username in the
/etc/passwdfile.Password, 13 character encrypted. A blank entry (eg.
::) indicates a password is not required to log in (usually a bad idea), and a - entry (eg. :-:) indicates the account has been disabled.The number of days (since January 1, 1970) since the password was last changed.
The number of days before password may be changed (0 indicates it may be changed at any time)
The number of days after which password must be changed (99999 indicates user can keep his or her password unchanged for many, many years)
The number of days to warn user of an expiring password (7 for a full week)
The number of days after password expires that account is disabled
The number of days since January 1, 1970 that an account has been disabled
A reserved field for possible future use
/etc/group
The /etc/group file stores group information or defines the user
groups. There is one entry per line, and each line has the following
format (all fields are separated by a colon (:)
cdrom:x:24:john,mike,yummy
Where,
group_name: Name of group.
Password: Generally password is not used, hence it is empty/blank. It can store encrypted password. This is useful to implement privileged groups.
Group ID (GID): Each user must be assigned a group ID. You can see this number in your /etc/passwd file.
Group List: It is a list of user names of users who are members of the group. The user names, must be separated by commas.
Read passwd/shadow file
The database of Unix users and groups consists of the textual files /etc/passwd (list of users), /etc/shadow (encrypted passwords of users), /etc/group (list of groups), and /etc/gshadow (encrypted passwords of groups).
The files can be manually edited with tools like
vipwandvigr.The
getent(get entries) command checks the system databases (including those of users and groups) using the appropriate library functions, which call the name service switch (NSS) modules configured in the/etc/nsswitch.conffile. The command takes one or two arguments:the name of the database to check, and
a possible search key.
The command
getent passwd ubuntuwill return the information from the user database regarding the user ubuntu.
getent passwd ubuntu
ubuntu:x:1000:1000:Ubuntu:/home/ubuntu:/bin/bash

getent shadow ubuntu
ubuntu:$6$Ki4ovKaqYeqICQJT$jCXXXXXXXXXXXXXXXXXXXXXXXXXXXXXXlFm.:18622:0:99999:7:::

getent group ubuntu
ubuntu:x:1000:
Gathering Information
From Files
/etc/issue     : Contains the message which is displayed on terminal before login.
/etc/motd      : Contains the message which is displayed on terminal after login.
/proc/cpuinfo  : provides information about CPU.
/proc/meminfo  : provides information about memory/RAM.
/proc/version  : provides information about the version of your system.
From Commands
last      : shows all the login attempts and the reboot occurred.
lastb     : shows all the bad login attempts.
lastlog   : shows the list of all the users and when did they login.
id        : print real and effective user and group IDs.
whoami    : whoami - print effective userid.
uname     : print system information.
  -a      : print all the information (Kernel name, nodename, kernel-release, kernel-version, machine, processor, hardware-platform)
pstree    : display a tree of processes.
hostname  : prints out the hostname of the machine which is stored in /etc/hostname.
Keyboard shortcuts
In Linux, various keyboard shortcuts can be used at the command prompt instead of actual long commands.
Moving
Ctrl + a : Move to the start of line.
Ctrl + e : Move to the end of line.
Alt  + b : Move to the start of the current word
Alft + f : Move to the end of the current word
Erasing
Ctrl + w : Cut from cursor to the previous whitespace.
Ctrl + u : Cut from cursor to the start of the line.
Ctrl + k : Cut from cursor to the end of the line.
Ctrl + y : Paste the last cut text.
Window
WinKey + H              : Minimize/Hide the Window
WinKey + Up Arrow Key   : Maximize the current windows
WinKey + Down Arrow Key : Return to original
Other shortcuts
CTRL-L : Clears the screen
CTRL-D : Exits the current shell
CTRL-Z : Puts the current process into a suspended background
CTRL-C : Kills the current process
CTRL-H : Works the same as backspace
Searching History
Search as you type. Ctrl + r and type the search term;
Read Command Line Editing for more information.
Difference between su and sudo
The difference between su and sudo is su forces the
administrator to share the root password to other users, whereas
sudo makes it possible to execute system commands without a root
password. sudo lets the user use their own password to execute
system commands, i.e., delegates system responsibility without root
password.
To temporarily become the superuser for a series of commands, we can
type su and then be prompted for the root password.
To execute just one command with root privilege sudo <command>. When
the command is complete, it will return to being a normal unprivileged
user.
su
Change users or become superuser. The difference between su - and
su is that former su - would switch to the new user directory.
It would also change the environment variable according to the changed
user. Whereas su would only change the user but will stay in the
same directory.
Example: su -
root@Kali-Home:~# su - bitvijays
bitvijays@Kali-Home:~$ pwd
/home/bitvijays
Example: su
root@Kali-Home:~# su bitvijays
bitvijays@Kali-Home:/root$ pwd
/root
su -c
Executing command as another user
su -c "command" : Specify a command that will be invoked by the shell using its -c.
Example:
su bitvijays -c id
uid=1000(bitvijays) gid=1001(bitvijays) groups=1001(bitvijays)
sudo
Execute a command as another user.
sudoallows users to run programs using the security privileges of another user, generally root (superuser).
sudo has the ability to keep track of unsuccessful attempts at
gaining root access. Users’ authorization for using sudo is based on
configuration information stored in the /etc/sudoers file and in the
/etc/sudoers.d directory.
A message such as the following would appear in a system log file
(usually /var/log/secure) when trying to execute sudo bash without
successfully authenticating the user:
authentication failure; logname=op uid=0 euid=0 tty=/dev/pts/6 ruser=op rhost= user=op
conversation failed
auth could not identify password for [op]
op : 1 incorrect password attempt ;
TTY=pts/6 ; PWD=/var/log ; USER=root ; COMMAND=/bin/bash
Command logging
By default, sudo commands and any failures are logged in
/var/log/auth.log under the Debian distribution family, and in
/var/log/messages and/or /var/log/secure on other systems. This
is an important safeguard to allow for tracking and accountability of
sudo use. A typical entry of the message contains:
Calling username
Terminal info
Working directory
User account invoked
Command with arguments.
Running a command such as sudo whoami results in a log file entry
such as:
Dec 8 14:20:47 server1 sudo: op : TTY=pts/6 PWD=/var/log USER=root COMMAND=/usr/bin/whoami
Adding user to sudoers groups
Whenever sudo is invoked, a trigger will look at /etc/sudoers
and the files in /etc/sudoers.d to determine if the user has the
right to use sudo and what the scope of their privilege is. Unknown
user requests and requests to do operations not allowed to the user even
with sudo are reported. The basic structure of entries in these
files is:
who where = (as_whom) what
Method 1
Create a configuration file in the /etc/sudoers.d/ directory with
the name of the file the same as the username. For example, if the
username is student.
Create the configuration file for student by doing this:
# echo "student ALL=(ALL) ALL" > /etc/sudoers.d/student
Also change permissions on the file:
# chmod 440 /etc/sudoers.d/student
Method 2
visudo
Disk-to-Disk Copying (dd)
dd can be used to make large exact copies, even of entire disk
partitions, efficiently.
For example, to back up the Master Boot Record (MBR) (the first 512-byte sector on the disk that contains a table describing the partitions on that disk)
dd if=/dev/sda of=sda.mbr bs=512 count=1
Warning
Typing: dd if=/dev/sda of=/dev/sdb to make a copy of one disk onto another, it will delete everything that previously existed on the second disk.
Process and Process attributes
A program is a set of instructions to execute a task. For instance, ls, cat or a python program to print “Hello World”.
A process is an instance of a program in execution.
A process is identified by the user who started it and is only permitted to take actions permitted for its owner.
Processes are used to perform various tasks on the system. They can be
single-threaded or multi-threaded and of different types, such as
interactive and non-interactive. Every process has a unique identifier
(PID) to enable the OS to keep track of it. The nice value, or niceness,
can set priority. ps provides information about the currently
running processes.
Processes can be of different types according to the task being performed.
Pro cess Type |
Description |
E xample |
|---|---|---|
Int erac tive P roce sses |
Started by user either using command line or GUI |
bash, firef ox,top |
B atch P roce sses |
Automatic processes that are scheduled and queued and work on FIFO basic |
upd atedb, ld config |
Dae mons |
Server processes that run continuously. |
httpd, sshd, li bvirtd |
Thr eads |
Lightweight processes. Task that runs under the main process, sharing memory and other resources. |
fi refox, gno me-ter minal- server |
Ke rnel Thr eads |
Kernel tasks that users neither start nor terminate. Such task perform actions like moving a thread from one CPU to another or making sure I/O operations to disk are completed. |
kth readd, migr ation, kso ftirqd |
All processes have certain attributes:
The program being executed
Context (state): Context of the process is a snapshot of itself by trapping the state of its CPU registers, where it is executing in the program, what is in the process memory, and other information.
Permissions: Every process has permissions based on which user has called it to execute. It may also have permissions based on who owns its program file. Programs which are marked with an ”s” execute bit have a different ”effective” user id than their ”real” user id.
Associated resources such as allocated memory, file handles, etc.
Controlling processes with ulimit
ulimit is a built-in bash command that displays or resets a number of resource limits associated with processes running under a shell. A system administrator can change the values:
To restrict capabilities so an individual user and/or process cannot exhaust system resources, such as memory, cpu time or the maximum number of processes on the system.
To expand capabilities so a process does not run into resource limits; for example, a server handling many clients may find that the default of 1024 open files makes its work impossible to perform.
ulimit -a
core file size          (blocks, -c) 0
data seg size           (kbytes, -d) unlimited
scheduling priority             (-e) 0
file size               (blocks, -f) unlimited
pending signals                 (-i) 30857
max locked memory       (kbytes, -l) 65536
max memory size         (kbytes, -m) unlimited
open files                      (-n) 1024
pipe size            (512 bytes, -p) 8
POSIX message queues     (bytes, -q) 819200
real-time priority              (-r) 0
stack size              (kbytes, -s) 8192
cpu time               (seconds, -t) unlimited
max user processes              (-u) 30857
virtual memory          (kbytes, -v) unlimited
file locks                      (-x) unlimited
There are two kinds of limits:
Hard Limit
The maximum value, set only by the root user, that a user can raise the resource limit to.
ulimit -H -n
4096
Soft Limit
The current limiting value, which a user can modify, but cannot exceed the hard limit.
ulimit -S -n
1024
ulimit [options] [limit] can set a particular limit. However, the
changes only affect the current shell. To make changes that are
effective for all logged-in users, modify /etc/security/limits.conf.
Process Scheduling and states
A critical kernel function called the scheduler constantly shifts processes on and off the CPU, sharing time according to relative priority, how much time is needed and how much has already been granted to a task.
Process can be in different states
Running: The process is either currently executing on a CPU or CPU core or sitting in the run queue, eagerly awaiting a new time slice.
Sleeping (Waiting): The process is waiting on a request (usually I/O) that it has made and cannot proceed further until the request is completed.
Stopped: The process has been suspended. This state is commonly experienced when a programmer wants to examine the executing program’s memory, CPU registers, flags, or other attributes.
Zombie: The process enters this state when it terminates, and no other process (usually the parent) has inquired about its exit state; i.e., reaped it. Such a process is also called a defunct process. A zombie process has released all of its resources, except its exit state and its entry in the process table.
Execution modes
At any given time, a process (or any particular thread of a multi-threaded process) may be executing in either user mode or system (kernel) mode.
User Mode
Except when executing a system call, processes execute in user mode, where they have lesser privileges than in the kernel mode. When a process is started, it is isolated in its own user space to protect it from other processes for security and stability (also known as process resource isolation).
Each process executing in user mode has its own memory space, parts of which may be shared with other processes; except for the shared memory segments, a user process is not able to read or write into or from the memory space of any other process.
Kernel Mode
In kernel (system) mode, the CPU has full access to all hardware on the system, including peripherals, memory, disks, etc. If an application needs access to these resources, it must issue a system call, which causes a context switch from user mode to kernel mode. This procedure must be followed when reading and writing from files, creating a new process, etc.
Process and Thread IDs
The OS keeps track of them by assigning each a unique process ID
(PID) number. The PID is used to track process state, CPU usage,
memory use, precisely where resources are located in memory, and other
characteristics.
Process ID (PID) : Unique Process ID number
Parent Process ID (PPID) : Process (Parent) that started this process.
Process Group ID (PGID) :
Thread ID (TID) : Thread ID number.
/proc/sys/kernel/pid_max hold the largest PID number that can be
assigned to a process.
Creating processes in command shell
What happens when a user executes a command in a command shell interpreter, such as bash?
A new process is created (forked from the user’s login shell).
A wait system call puts the parent shell process to sleep.
The command is loaded onto the child process’s space via the exec system call.
The command completes executing, and the child process dies via the exit system call.
The parent shell is re-awakened by the death of the child process and proceeds to issue a new shell prompt.
The parent shell then waits for the next command request from the user, at which time the cycle will be repeated.
Signals
Signals are used to emit notifications for processes to take action in
response to often unpredictable events. It is possible to send signals
from the command line using kill, killall and pkill. Signals
are used to notify processes about asynchronous events (or exceptions).
There are two paths by which signals are sent to a process:
From the kernel to a user process, as a result of an exception or programming error.
From a user process (using a system call) to the kernel which will then send it to a user process. The process sending the signal can actually be the same as the one receiving it.
When a process receives a signal, what it does will depend on the way
the program is written. It can take specific actions, coded into the
program, to handle the signal or it can just respond according to system
defaults. Two signals SIGKILL, SIGSTOP cannot be handled and
will always terminate the program.
Generally, signals are used to handle two things:
Exceptions detected by hardware (such as an illegal memory reference)
Exceptions generated by the environment (such as the premature death of a process from the user’s terminal).
list of the signals in Linux, along with their numbers:
kill -l
 1) SIGHUP       2) SIGINT       3) SIGQUIT      4) SIGILL       5) SIGTRAP
 2) SIGABRT      7) SIGBUS       8) SIGFPE       9) SIGKILL     10) SIGUSR1
1)  SIGSEGV     12) SIGUSR2     13) SIGPIPE     14) SIGALRM     15) SIGTERM
2)  SIGSTKFLT   17) SIGCHLD     18) SIGCONT     19) SIGSTOP     20) SIGTSTP
3)  SIGTTIN     22) SIGTTOU     23) SIGURG      24) SIGXCPU     25) SIGXFSZ
4)  SIGVTALRM   27) SIGPROF     28) SIGWINCH    29) SIGIO       30) SIGPWR
5)  SIGSYS      34) SIGRTMIN    35) SIGRTMIN+1  36) SIGRTMIN+2  37) SIGRTMIN+3
6)  SIGRTMIN+4  39) SIGRTMIN+5  40) SIGRTMIN+6  41) SIGRTMIN+7  42) SIGRTMIN+8
7)  SIGRTMIN+9  44) SIGRTMIN+10 45) SIGRTMIN+11 46) SIGRTMIN+12 47) SIGRTMIN+13
8)  SIGRTMIN+14 49) SIGRTMIN+15 50) SIGRTMAX-14 51) SIGRTMAX-13 52) SIGRTMAX-12
9)  SIGRTMAX-11 54) SIGRTMAX-10 55) SIGRTMAX-9  56) SIGRTMAX-8  57) SIGRTMAX-7
10) SIGRTMAX-6  59) SIGRTMAX-5  60) SIGRTMAX-4  61) SIGRTMAX-3  62) SIGRTMAX-2
11) SIGRTMAX-1  64) SIGRTMAX
Refer man 7 signal
Ctrl+Z suspends the process with SIGTSTP, and can be resumed later.
Ctrl+C kills the process with SIGINT that terminates the process unless it is handled/ignored by the target.
Kill the process
Users (including the superuser) can send signals to other processes
(programs) by using kill. The default signal sent is SIGTERM
which can be handled, or ignored by the receiving process to prevent its
death. It is preferable to use this signal to give the process a chance
to clean up after itself. If this signal is ignored, the user can
usually send a SIGKILL signal, which cannot be ignored, to kill the
process.
kill -SIGKILL <pid> or kill -9 <pid>
killall kills all processes with a given name, assuming the user has
sufficient privilege.
killall bash or killall -9 bash or killall -SIGKILL bash
pkill sends a signal to a process using selection criteria:
$ pkill [-signal] [options] [pattern]
-P: ppid
-G: gid
-U: uid
User and Group IDs
Users can be categorized into various groups. Each group is identified
by the Real Group ID (RGID). The access rights of the group are
determined by the Effective Group ID (EGID). Each user can be a
member of one or more groups.
Priorities
The priority for a process can be set by specifying a nice value, or niceness, for the process. The lower the nice value, the higher the priority. Low values are assigned to important processes, while high values are assigned to processes that can wait longer. A process with a high nice value allows other processes to be executed first.
In Linux, a nice value of -20 represents the highest priority, and
+19 represents the lowest.
ps lf : List the process. NI column represent nice priority
nice
Run a program with modified scheduling priority
nice -n 5 command [ARGS] : set the niceness by 5. If nice value is not given, the default is to increase the niceness by 10. If no arguments are provided, it reports current niceness.
renice
Alter priority of running processes
renice +5 process_id : change the priority of the process.
By default, only a superuser can decrease the niceness; i.e., increase
the priority. However, it is possible to give normal users the ability
to decrease their niceness within a predetermined range, by editing
/etc/security/limits.conf. After a non-privileged user has increased
the nice value, only a superuser can lower it back.
Load average
The load average is the average of the load number for a given period. It takes into account processes that are:
Actively running on a CPU
Considered runnable, but waiting for a CPU to become available
Sleeping: i.e. waiting for some resource (typically, I/O) to become available.
The load average can be viewed by running w, top or uptime
The load average is displayed using three numbers (X, Y, and Z) where X,Y,Z are 0.35, 0.15, 0.10. Assuming the system is a single-CPU system, the three load average numbers are interpreted as follows:
0.35: For the last minute, the system has been 35% utilized on average.
0.15: For the last 5 minutes, utilization has been 15%.
0.10: For the last 15 minutes, utilization has been 10%.
If we saw a value of
1.00in the second position, that would imply that the single-CPU system was 100% utilized, on average, over the past 5 minutes; A value over 1.00 for a single-CPU system implies that the system was over-utilized: more processes needing CPU than CPU were available.If we had a quad-CPU system, we would divide the load average numbers by the number of CPUs. For example, in this case, seeing a 1-minute load average of 4.00 implies that the system as a whole was 100% (4.00/4) utilized during the last minute.
Background and Foreground Processes
Linux supports background and foreground job processing.
Foreground jobs run directly from the shell. When one foreground job is running, other jobs need to wait for shell access (at least in that terminal window if using the GUI) until it is completed.
The background job will be executed at a lower priority, which, in turn, will allow smooth execution of the interactive tasks, and you can type other commands in the terminal window while the background job is running.
By default, all jobs are executed in the foreground. A job can be put in
the background by suffixing & to the command, for example:
updatedb &.
We can use CTRL-Z to suspend a foreground job or CTRL-C to
terminate a foreground job and can always use the bg and fg
commands to run a process in the background and foreground,
respectively.
Managing Jobs
The jobs utility displays all jobs running in the background. The
display shows the job ID, state, and command name.
jobs -l provides the same information as jobs, and adds the PID
of the background jobs.
System V IPC
System V IPC is a rather old method of Inter Process Communication. It involves three mechanisms: - Shared Memory Segments - Semaphores - Message Queues
Overall summary of System V IPC activity on system
ipcs
ipcs -p
Almost all of the currently running shared memory segments have a key of 0(also known as IPC_PRIVATE) which means they are only shared between processes in a parent/child relationship. Furthermore, all but one are marked for destructionwhen there are no further attachments
PS Command
System V style
ps provides information about currently running processes keyed by
PID. We can use top or htop or atop to get continuous
updates.
ps               : display all processes running under the current shell.
ps -u            : display information of processes for a specified username.
ps -ef           : display all the processes in the system in full detail.
ps -eLf          : display one line of information for every thread (remember, a process can contain multiple threads).
BSD Style
The command ps aux displays all processes of all users. The command
ps axo allows specifying which attributes to view.
ps aux
ps axo stat, priority, pid
Process Tree
pstree displays the processes running on the system in the form of a
tree diagram showing the relationship between a process and its parent
process and any other processes that it created.
top to get constant real-time updates (every two seconds by
default), until you exit by typing q. top clearly highlights
which processes are consuming the most CPU cycles and memory.
The third line of the top output indicates how the CPU time is being divided between the users (us) and the kernel (sy) by displaying the percentage of CPU time used for each.
The percentage of user jobs running at a lower priority (niceness - ni) is then listed. Idle mode (id) should be low if the load average is high and vice versa. The percentage of jobs waiting (wa) for I/O is listed. Interrupts include the percentage of hardware (hi) vs. software interrupts (si). Steal time (st) is generally used with virtual machines, which has some idle CPU time taken for other uses.
The default sorting is based on the current amount of processor use and can be obtained with the
Pkey.Other sort orders include a sort by occupied memory (
Mkey), by total processor time (Tkey), and by process identifier (Nkey).
t : Display or hide summary information (rows 2 and 3)
m : Display or hide memory information (rows 4 and 5)
A : Sort the process list by top resource consumers
r : Renice (change the priority of) specific processes
k : Kill a specific process by entering its process identifier
f : Enter the top configuration screen
o : Interactively select a new sort order in the process list
The xfce4-taskmanager graphical tool is similar to top and it provides roughly the same features. For GNOME users there is gnome-system-monitor and for KDE users there is ksysguard which are both similar as well.
Scheduling process
at
The at utility program to execute any non-interactive command at a
specified time
You can see if the job is queued up to run with atq:
atq
at now + 1 minute
at> date > /tmp/datestamp
CTRL-D

atq
cron
cronis a time-based scheduling utility program. It can launch routine background jobs at specific times and/or days on an ongoing basis.cronis driven by a configuration file called/etc/crontab(cron table), which contains the various shell commands that need to be run at the properly scheduled times.There are both system-wide crontab files and individual user-based ones. Each line of a crontab file represents a job and is composed of a so-called CRON expression, followed by a shell command to execute.
Typing crontab -e will open the crontab editor to edit existing jobs
or create new jobs. Each line of the crontab file will contain six
fields:
MIN  : Minutes      : 0 to 59
HOUR : Hour field   : 0 to 23
DOM  : Day of Month : 1-31
MON  : Month field  : 1-12
DOW  : Day Of Week  : 0-6 (0 = Sunday)
CMD  : Command      : Any command to be executed
Examples:
The below entry
* * * * * /usr/local/bin/execute/this/script.sh
will schedule a job to execute script.sh every minute of every hour
of every day of the month, and every month and every day in the week.
The below entry
30 08 10 06 * /home/sysadmin/full-backup
will schedule a full-backup at 8.30 a.m., 10-June, irrespective of the day of the week.
sleep
sleep suspends execution for at least the specified time, which can
be given as the number of seconds (the default), minutes, hours, or
days. After that time has passed (or an interrupting signal has been
received), execution will resume.
sleep NUMBER[SUFFIX]...
where SUFFIX may be:
s for seconds (the default)
m for minutes
h for hours
d for days.
sleep and at are quite different; sleep delays execution for a specific
period, while at starts execution at a later time.
Bash
Important configuration files - For Debian/Ubuntu based Systems
User Startup files
Files in the /etc directory define global settings for all users,
while initialization files in the user’s home directory can include
and/or override the global settings.
The startup files can do anything the user would like to do in every command shell, such as:
Customizing the prompt
Defining command line shortcuts and aliases
Setting the default text editor
Setting the path for where to find executable programs
The standard prescription is that when the user first login to Linux,
/etc/profile is read and evaluated, after which the following files
are searched (if they exist) in the listed order:
~/.bash_profile
~/.bash_login
~/.profile
where ~/. denotes the user’s home directory. The Linux login shell
evaluates whatever startup file that it comes across first and ignores
the rest. This means that if it finds ~/.bash_profile, it ignores
~/.bash_login and ~/.profile.
However, every time the user creates a new shell, or terminal window,
etc., the user do not perform a full system login; only a file named
~/.bashrc file is read and evaluated.
Most commonly, users only fiddle with ~/.bashrc, as it is invoked
every time a new command-line shell initiates or another program is
launched from a terminal window, while the other files are read and
executed only when the user first logs onto the system.
~/.bash_profile- Stores user environment variables.~/.bash_history- contains all the history of the commands.~/.bash_logout- contains the commands which are executed when bash is exited.~/.bashrc- setting of variables for bash./etc/profile- Global system configuration for bash, which controls the environmental variables and programs that are to be run when bash is executed. The setting of PATH variable and PS1./etc/bashrc- Global system configuration for bash which controls the aliases and functions to be run when bash is executed
Command history
Recalling Previous commands
The history command recalls a list of previous commands, which can
be edited and recycled.
bash keeps track of previously entered commands and statements in a
history buffer. We can recall previously used commands simply by using
the Up and Down cursor keys.
To view the list of previously executed commands:
history
The list of commands is displayed, with the most recent command
appearing last in the list. This information is stored in
~/.bash_history. If you have multiple terminals open, the commands
typed in each session are not saved until the session terminates.
The below variables can be set in the ~/.bashrc file to configure
the bash history.
- HISTSIZE     - Controls the number of commands to remember in the history command. The default value is 500.
- HISTFILE     - Defines the file to which all commands will be logged. Normally the value for this variable is set to ~/.bash_history. This means that whatever you type in bash will be stored into the value of HISTFILE. It is advisable to leave it undefined or pipe the output to /dev/null (For privacy reasons).
- HISTFILESIZE - Defines the maximum number of commands in ~/.bash_history.
- HISTCONTROL  - How commands are stored
- HISTIGNORE   - which command lines can be unsaved
Finding and using previous commands
Up/Down arrow keys            : Browse through the list of commands previously executed
!! (Pronounced as bang-bang)  : Execute the previous command
CTRL-R                        : Search previously used commands
Executing previous command
!       : Start a history substitution
!$      : Refer to the last argument in a line
!n      : Refer to the nth command line
!string : Refer to the most recent command starting with the string
Bash Command Substitution
Bash may need to substitute the result of a command as a portion of another command. It can be done in two ways:
By enclosing the inner command in
$( )By enclosing the inner command with backticks (`)
Command substitution allows the output of a command to replace the command itself. Command substitution occurs when a command is enclosed as follows:
$(command)
or
`command`
Bash performs the expansion by executing the command and replacing the command substitution with the standard output of the command, with any trailing newlines deleted.
Bash Case Modification
The below expansion operators modify the case of the letters in the expanded text.
${PARAMETER^}   : ^ operator modifies the first character to uppercase
${PARAMETER,}   : , operator modifies the first character to lowercase
${PARAMETER^^}  : ^^ operator modified all the characters to uppercase
${PARAMETER,,}  : ,, operator modified all the characters to lowercase
${PARAMETER~}   : ~ reverses the case of the first letter of words in the variable
${PARAMETER~~}  : ~~ reverses the case of all letters of words in the variable
Example: Parameter ^
VAR="hack the PLANET"

echo ${VAR^}
Hack the PLANET

echo ${VAR^^}
HACK THE PLANET
Example: Parameter ,
VAR="HACK THE PLANET"

echo ${VAR,}
hACK THE PLANET

echo ${VAR,,}
hack the planet
Example: Parameter ~
VAR="hack the PLANET"

echo ${VAR~}
Hack The pLANET

echo ${VAR~~}
HACK THE planet
Bash Programming
Linux provides a wide choice of shells; exactly what is available on the
system is listed in /etc/shells. Typical choices are:
/bin/sh
/bin/bash
/bin/tcsh
/bin/csh
/bin/ksh
/bin/zsh
A shell is a command-line interpreter which provides the user interface for terminal windows. It can also be used to run scripts, even in non-interactive sessions without a terminal window, as if the commands were being directly typed in.
For example, typing find . -name "*.c" -ls at the command line
accomplishes the same thing as executing a script file containing the
lines:
#!/bin/bash
find . -name "*.c" -ls
The first line of the script, which starts with #!, contains the
full path of the command interpreter (in this case /bin/bash) that
is to be used on the file.
Conditional statements
For Loop
The for loop operates on each element of a list of items. The syntax
for the for loop is:
for variable-name in list
do
    execute one iteration for each item in the list until the list is finished
done
Example:
for i in $( ls ); do
    echo item: $i
done
Bash loop thru array of strings
## declare an array variable
declare -a arr=("element1" "element2" "element3")

## now loop through the above array
for i in "${arr[@]}"
    do
       echo "$i"
       # or do whatever with the individual element of the array
    done
Value of the variable
The value of the variable whose name is in this variable can be found by
echo ${!n}
For example:
eth0="$(ip -o -4 address | grep eth0 | awk '{print $4}')"
wlan0="$(ip -o -4 address | grep wlan0 | awk '{print $4}')"
##eth0 and wlan0 contains the subnet of the eth0 and wlan0.

for interfaces in "eth0" "wlan0"
    do
        ##var would actually get the value of that variable
        var="${!interfaces}"
    done
Sample output with ${!interfaces}:
10.233.113.136/23
Sample output with ${interfaces}:
eth0
wlan0
While loop
The while loop repeats a set of statements as long as the control
command returns true. The syntax is:
while condition is true
do
    Commands for execution
    ----
done
Until loop
The until loop repeats a set of statements as long as the control
command is false. Thus, it is essentially the opposite of the
while loop. The syntax is:
until condition is false
do
    Commands for execution
    ----
done
If Statement
Conditional decision making, using an if statement is a basic construct that any useful programming or scripting language must-have.
IF Function
A more general definition is:
if condition
then
       statements
else
       statements
fi
Example:
if [ "foo" = "foo" ]; then
       echo expression evaluated as true
else
       echo expression evaluated as false
fi
elif statement
You can use the elif statement to perform more complicated tests and
take appropriate action. The basic syntax is:
if [ sometest ] ; then
    echo Passed test1
elif [ somothertest ] ; then
    echo Passed test2
fi
case statement
Here is the basic structure of the case statement:
case expression in
   pattern1) execute commands;;
   pattern2) execute commands;;
   pattern3) execute commands;;
   pattern4) execute commands;;
   * )       execute some default commands or nothing ;;
esac
Bash functions
A function is a code block that implements a set of operations.
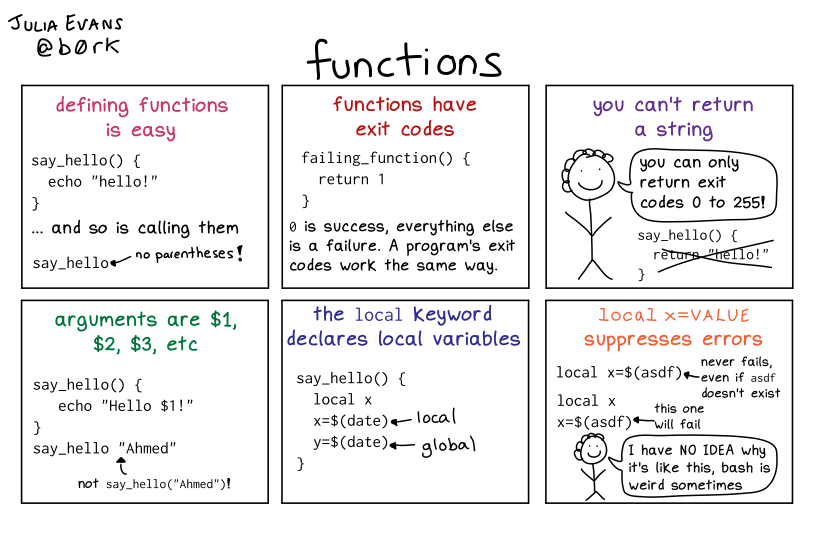
Bash Functions
Functions are useful for executing procedures multiple times, perhaps with varying input variables. Functions are also often called subroutines. Using functions in scripts requires two steps:
Declaring a function
Calling a function
The function declaration requires a name that is used to invoke it. The proper syntax is:
function_name () {
   command...
}
For example, the following function is named display:
display () {
   echo "This is a sample function"
}
The function can be as long as desired and have many statements. Once defined, the function can be called later as many times as necessary.
Shell script
shell script arguments
Users often need to pass parameter values to a script, such as a filename, date, etc. Scripts will take different paths or arrive at different values according to the parameters (command arguments) that are passed to them.
$0           : Script name
$1           : First parameter
$2, $3, etc. : Second, third parameter, etc.
$*           : All parameters
$#           : Number of arguments
shell script arguments
Debugging bash scripts
Debugging helps to troubleshoot and resolve such errors and is one of the most important tasks a system administrator performs.
We can run a bash script in debug mode either by doing
bash -x ./script_file, or bracketing parts of the script with
set -x and set +x. The debug mode helps identify the error
because:
It traces and prefixes each command with the + character.
It displays each command before executing it.
It can debug only selected parts of a script (if desired) with:
set -x    # turns on debugging
set +x    # turns off debugging
Return values
All shell scripts generate a return value upon finishing execution, which can be explicitly set with the exit statement. Return values permit a process to monitor the exit state of another process, often in a parent-child relationship.
Viewing return values
As a script executes, one can check for a specific value or condition
and return success or failure as a result. By convention, success is
returned as 0, and failure is returned as a non-zero value.
echo $?
0
When run on a non-existing file, it returns 2.
Script Syntax
Scripts require you to follow a standard language syntax. Rules delineate how to define variables and how to construct and format allowed statements, etc.
#  : Used to add a comment, except when used as \#, or as #! when starting a script
\  : Used at the end of a line to indicate continuation on to the next line
;  : Used to interpret what follows as a new command to be executed next
$  : Indicates what follows is an environment variable
>  : Redirect output
>> : Append output
<  : Redirect input
|  : Used to pipe the result into the next command
Shellcheck
ShellCheck is a tool that gives warnings and suggestions for bash/sh shell scripts:

Shellcheck
Creating Temp Directory and files
Temporary files (and directories) are meant to store data for a short time.
The best practice is to create random and unpredictable filenames for
temporary storage. One way to do this is with the mktemp utility, as
in the following examples.
The XXXXXXXX is replaced by mktemp with random characters to
ensure the name of the temporary file cannot be easily predicted and is
only known within the program.
TEMP=$(mktemp /tmp/tempfile.XXXXXXXX)       : To create a temporary file
TEMPDIR=$(mktemp -d /tmp/tempdir.XXXXXXXX)  : To create a temporary directory
Discarding output with /dev/null
Certain commands (like find) will produce voluminous amounts of
output, which can overwhelm the console. To avoid this, we can redirect
the large output to a special file (a device node) called /dev/null.
This pseudofile is also called the bit bucket or black hole.
All data written to it is discarded, and write operations never return a failure condition. Using the proper redirection operators, it can make the output disappear from commands that would normally generate output to stdout and/or stderr:
ls -lR /tmp > /dev/null
In the above command, the entire standard output stream is ignored, but any errors will still appear on the console. However, if one does:
ls -lR /tmp >& /dev/null
both stdout and stderr will be dumped into /dev/null.
Random number
It is often useful to generate random numbers and other random data when performing tasks such as:
Performing security-related tasks
Reinitializing storage devices
Erasing and/or obscuring existing data
Generating meaningless data to be used for tests.
Such random numbers can be generated by using the $RANDOM
environment variable, which is derived from the Linux kernel’s built-in
random number generator.
The Linux kernel offers the /dev/random and /dev/urandom device
nodes, which draw on the entropy pool to provide random numbers which
are drawn from the estimated number of bits of noise in the entropy
pool.
/dev/random is used where very high-quality randomness is required,
such as a one-time pad or key generation, but it is relatively slow to
provide values. /dev/urandom is faster and suitable (good enough)
for most cryptographic purposes.
Multiple commands on a single line
Thus, the three commands in the following example will all execute, even if the ones preceding them fail:
make ; make install ; make clean
However, we may want to abort subsequent commands when an earlier one
fails. We can do this using the && (and) operator as in:
make && make install && make clean
If the first command fails, the second one will never be executed. A
final refinement is to use the || (or) operator, as in:
cat file1 || cat file2 || cat file3
I/O Redirection
Output redirection
The > character is used to write output to a file. For example, the
following command sends the output of free to /tmp/free.out:
free > /tmp/free.out
Two > characters (>>) will append output to a file if it exists
and act just like > if the file does not already exist.
Input redirection
Just as the output can be redirected to a file, the input of a command
can be read from a file. The process of reading input from a file is
called input redirection and uses the < character.
Equality Tests
test      : checks file types and compare values
  -d      : check if the file is a directory
  -e      : check if the file exists
  -f      : check if the file is a regular file
  -g      : check if the file has SGID permissions
  -r      : check if the file is readable
  -s      : check if the file's size is not 0
  -u      : check if the file has SUID permissions
  -w      : check if the file is writeable
  -x      : check if the file is executable
Example
if test -f /etc/foo.txt
then
It can also be written as
if [ -f /etc/foo.txt ]; then

--square brackets [] form test.
-- There has to be white space surrounding both square brackets
List of equality tests
Checks equality between numbers
x -eq y         : Check is x equals to y
x -ne y         : Check if x does not equal to y
x -gt y         : Check if x is greater than y
x -lt y         : Check if x is less than y
x -ge y         : Greater than or equal to
x -le y         : Less than or equal to
Checks equality between strings
x = y           : Check if x is the same as y
x != y          : Check if x is not the same as y
-n x            : Evaluates to true if x is not null
-z x            : Evaluates to true if x is null.
##Check in the following way --> if [ -z "$VAR" ];
Arithmetic expressions
Arithmetic expressions can be evaluated in the following three ways (spaces are important!):
Using the expr
expr is a standard but somewhat deprecated program. The syntax is as follows:
expr 8 + 8
echo $(expr 8 + 8)
Using the $((…)) syntax
This is the built-in shell format. The syntax is as follows:
echo $((x+1))
Using the built-in shell command let
The syntax is as follows:
let x=( 1 + 2 ); echo $x
In modern shell scripts, the use of expr is better replaced with var=$((…)).
System Administration
Package Management
Package management systems supply the tools that allow system administrators to automate installing, upgrading, configuring and removing software packages in a known, predictable and consistent manner. It allows:
Gather and compress associated software files into a single package (archive), which may require other packages to be installed first.
Allow for easy software installation or removal.
Can verify file integrity via an internal database.
Can authenticate the origin of packages.
Facilitate upgrades.
Group packages by logical features.
Manage dependencies between packages.
A given package may contain executable files, data files, documentation, installation scripts and configuration files. Also included are metadata attributes such as version numbers, checksums, vendor information, dependencies, descriptions, etc. Upon installation, all that information is stored locally into an internal database, which can be conveniently queried for version status and update information.
Package Types
Packages come in several different types.
Binary Packages: Binary packages contain files ready for deployment, including executable files and libraries. These are architecture dependent.
Source Packages: Source packages are used to generate binary packages; you should always be able to rebuild a binary package from the source package. One source package can be used for multiple architectures.
Architecture-independent: Architecture-independent packages contain files and scripts that run under script interpreters, as well as documentation and configuration files.
Meta-packages: Meta-packages are groups of associated packages that collect everything needed to install a relatively large subsystem, such as a desktop environment, or an office suite, etc
Package management systems operate on two distinct levels:
a low-level tool (such as
dpkgorrpm) takes care of the details of unpacking individual packages, running scripts, getting the software installed correctly.a high-level tool (such as
apt,yum,dnforzypper) works with groups of packages, downloads packages from the vendor, and figures out dependencies.
Advanced Packaging Tool (apt) is the underlying package management
system that manages software on Debian-based systems. yum is an
open-source command-line package-management utility for the
RPM-compatible Linux systems that belong to the Red Hat family. Fedora
and RHEL 8 have replaced yum with dnf. zypper is the package
management system for the SUSE/openSUSE family and is also based on RPM.
Updating Linux System using a low-level tool
Using dpkg (Debian/Ubuntu)
dpkg is the underlying package manager for Debian. It can install,
remove, and build packages. Unlike higher-level package management
systems, it does not automatically download and install packages and
satisfy their dependencies. Package files have a .deb suffix and the
DPKG database resides in the /var/lib/dpkg directory.
Debian package file names are based on fields that represent specific
information. The standard naming format for a binary package is:
<name>_<version>-<revision_number>_<architecture>.deb
In the Debian packaging system, a source package consists of at least three files:
An upstream tarball, ending with
.tar.gz. This is the unmodified source as it comes from the package maintainers.A description file, ending with
.dsc, containing the package name and other metadata, such as architecture and dependencies.A second tarball that contains any patches to the upstream source, and additional files created for the package, and ends with a name
.debian.tar.gzor.diff.gz, depending on distribution.
apt source bash
For Debian-based systems, the higher-level package management system is
the Advanced Package Tool (APT) system of utilities. Generally, while
each distribution within the Debian family uses APT, it creates its own
user interface on top of it (for example, apt, apt-get,
aptitude, synaptic, Ubuntu Software Center, Update Manager,
etc). Although apt repositories are generally compatible with each
other, the software they contain generally is not. Therefore, most
repositories target a particular distribution (like Ubuntu), and often
software distributors ship with multiple repositories to support
multiple distributions.
dpkg -i Package.deb             - Install package (performs two steps automatically: it unpacks the package and runs the configuration scripts.).
       --unpack
       --configure
dpkg -r Package                 - Removes everything except configuration files.
dpkg --remove Package           - Removes everything except configuration files.
dpkg -P (Package>               - Removes configurations files too.
dpkg -l                         - Shows the list of all installed packages.
dpkg -l b*                      - provide wildcards (such as b*) to search for packages that match a particular partial search string.
dpkg -L "Package name"          - Shows a list of files installed by specific packages (configuration and documentation files).
dpkg --listfiles "Package name" - Shows a list of files installed by specific packages.
dpkg --search file (or -S)      - finds any packages containing the file or path passed in the argument
dpkg --status package (or -s)   - Show information about an installed package (metadata and possible recommended packages)
dpkg --info file.deb (or -I)    - Show information about a package file and displays the headers of the specified .deb file
dpkg --contents file.deb (or -c)- lists all the files in a particular .deb file
dpkg -V package                 - Verify the installed package's integrity
Often, examples of configuration files for packages are provided in the
/usr/share/doc/package/examples/dpkg options that query the internal dpkg database stored on the filesystem at
/var/lib/dpkgand contains multiple sections includingconfiguration scripts (
/var/lib/dpkg/info),a list of files the package installed (
/var/lib/dpkg/info/*.list), andthe status of each package that has been installed (
/var/lib/dpkg/status).
Installing/Upgrading/Uninstalling Packages
Install/upgrade
dpkg -i package.deb
Remove a package except for its configuration files
dpkg -r package
Remove all of an installed package, including its configuration files
dpkg -P package
Using RPM (Red hat and Fedora)
Red Hat Package Manager (RPM) is the other package management system popular on Linux distributions. It was developed by Red Hat and adopted by a number of other distributions, including SUSE/OpenSUSE, Mageia, CentOS, Oracle Linux, and others.
RPM package file names are based on fields that represent specific information, as documented in the RPM standard. The standard naming format for a binary RPM package is:
<name>-<version>-<release>.<distro>.<architecture>.rpm
sed-4.5-2.e18.x86_64.rpm
The standard naming format for a source RPM package is:
<name>-<version>-<release>.<distro>.src.rpm
sed-4.5-2.e18.src.rpm
/var/lib/rpm is the default system directory which holds RPM
database files in the form of Berkeley DB hash files. The database files
should not be manually modified; updates should be done only through the
use of the rpm program. Helper programs and scripts used by RPM reside
in /usr/lib/rpm. rpmrc file can specify default settings for
rpm. By default, rpm looks for:
/usr/lib/rpm/rpmrc/etc/rpmrc~/.rpmrcin the above order.
rpm
-q: query
-f: allows you to determine which package a file came from
-l: lists the contents of a specific package
-a: all the packages installed on the system
-i: information about the package
-p: run the query against a package file instead of the package database
rpm query command examples:
rpm -q bash                 : Which version of a package is installed?
rpm -qf /bin/bash           : Which package did this file come from?
rpm -ql bash                : What files were installed by this package?
rpm -qi bash                : Show information about this package.
rpm -qa                     :   for query, and look at all packages on the system
"rpm -e" for erase
--test
rpm -q --requires bash      : --requires option will return a list of prerequisites for a package
rpm -q --whatprovides bzip2 : whatprovides option will show what installed package provides a particular requisite package
--whatrequires              :
Installing packages
rpm -ivh bash-4.4.19-12.el8_0.x86_64
-i : install
-v : verbose,
-h : print out hash marks to show progress.
Tasks RPM performs when installing a package:
Performs dependency checks
Performs conflict checks such as installing an already-installed package or to install an older version over a newer version.
Executes commands required before installation
Deals intelligently with configuration files: When installing a configuration file, if the file exists and has been changed since the previous version of the package was installed, RPM saves the old version with the suffix
.rpmsave.Unpacks files from packages and installs them with correct attributes
Executes commands required after installation
Updates the system RPM database
Uninstalling packages
rpm
-e      : uninstall (erase) a package
--test  : determine whether the uninstall would succeed or fail, without actually doing the uninstall
-v      : verbose
Updating packages
Upgrading replaces the original package (if installed), as in:
rpm -Uvh <package_name>
When upgrading, the already installed package is removed after the newer
version is installed. The one exception is the configuration files from
the original installation, which are kept with a .rpmsave extension.
To downgrade with rpm -U (that is, to replace the current version with
an earlier version), add the --oldpackage option to the command
line.
Freshening Packages
rpm -Fvh *.rpm
will attempt to freshen all the packages in the current directory. The below rules are applied:
If an older version of a package is installed, it will be upgraded to the newer version in the directory.
If the version on the system is the same as the one in the directory, nothing happens.
If there is no version of a package installed, the package in the directory is ignored.
The -F option is useful when you have downloaded several new patches and want to upgrade the packages that are already installed, but not install any new ones.
Freshening can be useful for applying a lot of patches (i.e., upgraded packages) at once.
Verifying packages
The -V option to rpm allows you to verify whether the files from a
particular package are consistent with the system’s RPM database.
rpm -Va verify all packages on the system.
The output may contain
S: filesize differs
M: mode differs (permissions and file type)
5: MD5 sum differs
D: device major/minor number mismatch
L: readLink path mismatch
U: user ownership differs
G: group ownership differs
T: mTime differs
For example,
rpm -V logrotate

S.5....T. c /etc/logrotate.conf
missing    /usr/sbin/logrotate
Upgrading the kernel
To install a new kernel on a Red Hat-based system, do:
rpm -ivh kernel-{version}.{arch}.rpm
filling in the correct version and architecture names.
The GRUB configuration file will automatically be updated to include the new version; it will be the default choice at boot, unless reconfigured with anything else.
Other
rpm2archive is used to convert RPM package files to tar archives. If
- is given as an argument, input and output will be on stdin and
stdout.
Convert an RPM package file to an archive:
rpm2archive bash-XXXX.rpm : creates bash-XXXX.rpm.tgz.
Extract in one step:
cat bash-XXXX.rpm | rpm2archive - | tar -xvz
Updating Linux System using a high-level tool
The higher-level package management systems (such as dnf, yum, apt and zypper) work with databases of available software and incorporate the tools needed to find, install, update, and uninstall software in a highly intelligent fashion.
Using apt-get
apt, apt-get, apt-cache utilities are the APT command line
tools for package management.
The
sources.listfile is the key configuration file for defining package sources (or repositories that contain packages).Debian use three sections to differentiate packages according to the licenses chosen by the authors of each work:
maincontains all packages that fully comply with the Debian Free Software Guidelines;non-freecontains software that does not (entirely) conform to the Free Software Guidelines but can nevertheless be distributed without restrictions; andcontrib(contributions) includes open source software that cannot function without some non-free elements.
Queries
apt-cache search "Keywords"            : Search package name based on keywords.
apt-cache search -n "Keywords"         : Show packages that has keyword in the packagename
apt-cache pkgnames [prefix]            : Prints the name of each package APT knows; Prefix match to filter the name list
apt-cache show  "Package name"         : Shows what package is used for.
apt-cache policy <packageName>         : Provides information of all available package versions.
apt-cache showpkg package_name         : Displays detailed information about the package
apt-cache depends package_name         : Lists all dependent packages for package_name
apt-cache rdepends package_name        : rdepends shows a listing of each reverse dependency a package has
apt-file search file_name              : Searches the repository for a file
apt-file list package_name             : Lists all files in the package
apt-cache search metapackage           : Provide list of group of packages maintained
Installing/Removing/Upgrading Packages
apt-get install "Package Name"         : Install the package.
apt-get remove  "Package Name"         : Uninstall the package.
apt-get purge   "Package Name"         : Removes the package as well as the configuration files.
apt-get update                         : Sync with Repositories.
apt-get upgrade                        : Upgrade installed packages.
apt-get dist-upgrade                   : Upgrade distribution packages.
apt-get autoremove                     : Remove unwanted packages (such as older linux kernel versions)
apt-get clean                          : Cleans out cache files and any archived package files
Tip
As mostly, updating takes time, you can club all the commands like apt-get update && apt-get upgrade && apt-get dist-upgrade && poweroff. poweroff would shut down the system after everything is updated.
If
sources.listlists several distributions, we can specify the package version withapt install package=version.Through the addition of suffixes to package names, we can use apt (or apt-get and aptitude) to install certain packages and remove others on the same command line.
With an
apt installcommand, add-to the names of the packages to remove. With anapt removecommand, add+to the names of the packages to install.
apt configuration
Files in
/etc/apt/apt.conf.d/are instructions for the configuration of APT. APT processes the files in alphabetical order, so that the later files can modify configuration elements defined in the earlier files.We can alter APT’s behavior through command-line arguments to dpkg. For example, the below performs a forced overwrite install of zsh:
# apt -o Dpkg::Options::="--force-overwrite" install zsh
The above (and any other) directive can be added to a file in
/etc/apt/apt.conf.d/. A common convention for file name is to use either local or 99local:$ cat /etc/apt/apt.conf.d/99local Dpkg::Options { "--force-overwrite"; }
Another configuration requiring web and FTP network proxy can be
Acquire::http::proxy "http://yourproxy:3128" (HTTP proxy)
Acquire::ftp::proxy "ftp://yourproxy" (FTP proxy)
Package Priorities
APT configuration also allows the management of the priorities associated with each package source.
We can modify the priorities by adding entries in the
/etc/apt/preferencesfile with the names of the affected packages, their version, their origin and their new priority.APT defines several default priorities.
Each installed package version has a priority of 100.
A non-installed version has a priority of 500 by default but it can jump to 990 if it is part of the target release (defined with the -t command-line option or the APT::Default-Release configuration directive).
Package priorities
A package whose priority is less than 0 will never be installed.
A package with a priority ranging between 0 and 100 will only be installed if no other version of the package is already installed.
With a priority between 100 and 500, the package will only be installed if there is no other newer version installed or available in another distribution.
A package of priority between 501 and 990 will only be installed if there is no newer version installed or available in the target distribution.
With a priority between 990 and 1000, the package will be installed except if the installed version is newer.
A priority greater than 1000 will always lead to the installation of the package even if it forces APT to downgrade to an older version.
For example: If there are several local programs depending on the version 5.22 of Perl and that we want to ensure that upgrades will not install another version of it.
ExplanationL Multiple packages dependent on perl 5.22
Package: perl
Pin: version 5.22*
Pin-Priority: 1001
Working with different distributions
There might be cases where we might want to try out a software package available in Debian Unstable, or Debian Experimental without diverging too much from the system’s initial state.
First, list all distributions used in
/etc/apt/sources.listand define your reference distribution with theAPT::Default-Releaseparameter.In this case, we can use
apt install package/unstableto install a package from Debian Unstable. If the installation fails due to some unsatisfiable dependencies, let it solve those dependencies within Unstable by adding the-t unstableparameter.In this situation, upgrades (upgrade and full-upgrade) are done within Debian stable except for packages already upgraded to another distribution: those will follow updates available in the other distributions.
apt-cache policycam be used to verify the given priorities. We can useapt-cache policy packageto display the priorities of all available versions of a given package.
Tracking automatically installed packages
apt tracks the packages installed only through dependencies often known as automatic and often include libraries.
When packages are removed, the package managers can compute a list of automatic packages that are no longer needed (because there are no manually installed packages depending on them).
The command
apt autoremovewill get rid of those packages.It is a good habit to mark as automatic any package that we don’t need directly so that they are automatically removed when they aren’t necessary anymore.
We can use
apt-mark auto packageto mark the given package as automatic, whereasapt-mark manual packagedoes the opposite.aptitude markautoand aptitude unmarkauto work in the same way, although they offer more features for marking many packages at once.We can use
aptitude why packageto know why an automatically installed package is present on the system.
$ aptitude why python-debian
i   aptitude         Recommends apt-xapian-index
i A apt-xapian-index Depends    python-debian (>= 0.1.15)
Multi-Arch Support
All Debian packages have an
Architecturefield in their control information. The field can contain eitherall(for packages that are architecture-independent) or the name of the architecture that it targets (likeamd64, orarmhf).dpkgwill only install the package if its architecture matches the host’s architecture as returned bydpkg --print-architecture.Multi-arch support for
dpkgallows users to define foreign architectures that can be installed on the current system usingdpkg --add-architecture. Foreign packages can then be installed withapt install package:architecture.To make multi-arch actually useful and usable, libraries had to be repackaged and moved to an architecture-specific directory so that multiple copies (targeting different architectures) can be installed alongside one another. Such updated packages contain the
Multi-Arch: sameheader field to tell the packaging system that the various architectures of the package can be safely co-installed (and that those packages can only satisfy dependencies of packages of the same architecture).$ dpkg -s libwine dpkg-query: error: --status needs a valid package name but 'libwine' is not: ambiguous package name 'libwine' with more than one installed instance Use --help for help about querying packages. $ dpkg -s libwine:amd64 libwine:i386 | grep ^Multi Multi-Arch: same Multi-Arch: same $ dpkg -L libgcc1:amd64 | grep .so [...] /usr/lib/x86_64-linux-gnu/wine/libwine.so.1 $ dpkg -S /usr/share/doc/libwine/copyright libwine:amd64, libwine:i386: /usr/share/doc/libwine/copyright
Deep-dive APT
We would look inside the packages and look at the internal meta-information (or information about other information) used by the package management tools.
This combination of a file archive and of meta-information is directly visible in the structure of a .deb file, which is simply an ar archive, concatenating three files:
$ ar t xxd_2%3a8.2.3995-1ubuntu2.10_armhf.deb
debian-binary
control.tar.zst
data.tar.zst
The debian-binary file contains a single version number describing the format of the archive:
$  ar p xxd_2%3a8.2.3995-1ubuntu2.10_armhf.deb debian-binary
2.0
The control.tar.gz archive contains meta-information:
$ ar p /var/cache/apt/archives/apt_1.4~beta1_amd64.deb control.tar.gz | tar -tzf -
./
./conffiles
./control
./md5sums
./postinst
./postrm
./preinst
./prerm
./shlibs
./triggers
And finally, the data.tar.xz archive (the compression format might vary) contains the actual files to be installed on the file system:
$ ar p /var/cache/apt/archives/apt_1.4~beta1_amd64.deb data.tar.xz | tar -tJf -
./
./etc/
./etc/apt/
./etc/apt/apt.conf.d/
./etc/apt/apt.conf.d/01autoremove
./etc/apt/preferences.d/
./etc/apt/sources.list.d/
The control file
control file is contained in the control.tar.gz archive. The control file contains the most vital information about the package. It uses a structure similar to email headers and can be viewed with the dpkg -I command. For example, the control file for apt looks like this:
$ dpkg -I apt_1.4~beta1_amd64.deb control
Package: apt
Version: 1.4~beta1
Architecture: amd64
Maintainer: APT Development Team
Installed-Size: 3478
Depends: adduser, gpgv | gpgv2 | gpgv1, debian-archive-keyring, init-system-helpers (>= 1.18~), libapt-pkg5.0 (>= 1.3~rc2), libc6 (>= 2.15), libgcc1 (>= 1:3.0), libstdc++6 (>= 5.2)
Recommends: gnupg | gnupg2 | gnupg1
Suggests: apt-doc, aptitude | synaptic | wajig, dpkg-dev (>= 1.17.2), powermgmt-base, python-apt
Breaks: apt-utils (<< 1.3~exp2~)
Replaces: apt-utils (<< 1.3~exp2~)
Section: admin
Priority: important
Description: commandline package manager
 This package provides commandline tools for searching and
 managing as well as querying information about packages
 as a low-level access to all features of the libapt-pkg library.
 .
 These include:
  * apt-get for retrieval of packages and information about them
    from authenticated sources and for installation, upgrade and
    removal of packages together with their dependencies
  * apt-cache for querying available information about installed
    as well as installable packages
  * apt-cdrom to use removable media as a source for packages
  * apt-config as an interface to the configuration settings
  * apt-key as an interface to manage authentication keys
Dependencies: the Depends Field
The package dependencies are defined in the
Dependsfield in the package header.It is a list of conditions to be met for the package to work correctly—this information is used by tools such as apt in order to install the required libraries, in appropriate versions fulfilling the dependencies of the package to be installed.
The dependencies system is a good mechanism for guaranteeing the operation of a program but it has another use with metapackages. These are empty packages that only describe dependencies. They facilitate the installation of a consistent group of programs preselected by the metapackage maintainer; as such, apt install metapackage will automatically install all of these programs using the metapackage’s dependencies.
Pre-Depends, a More Demanding Depend
Pre-dependencies, which are listed in the
Pre-Dependsfield in the package headers, complete the normal dependencies; their syntax is identical. A normal dependency indicates that the package in question must be unpacked and configured before configuration of the package declaring the dependency. A pre-dependency stipulates that the package in question must be unpacked and configured before execution of the pre-installation script of the package declaring the pre-dependency, that is before its installation.
Recommends, Suggests, and Enhances Fields
The
RecommendsandSuggestsfields describe dependencies that are not compulsory. The recommended dependencies, the most important, considerably improve the functionality offered by the package but are not indispensable to its operation. The suggested dependencies, of secondary importance, indicate that certain packages may complement and increase their respective utility, but it is perfectly reasonable to install one without the others.The Enhances field also describes a suggestion, but in a different context. It is indeed located in the suggested package, and not in the package that benefits from the suggestion.
Conflicts: the Conflicts Field
The Conflicts field indicates when a package cannot be installed simultaneously with another. The most common reasons for this are that both packages include a file of the same name, provide the same service on the same transmission control protocol (TCP) port, or would hinder each other’s operation.
Incompatibilities: the Breaks Field
The Breaks field has an effect similar to that of the Conflicts field, but with a special meaning. It signals that the installation of a package will break another package (or particular versions of it). In general, this incompatibility between two packages is transitory and the Breaks relationship specifically refers to the incompatible versions.
Provided Items: the Provides Field
This field introduces the very interesting concept of a virtual package. It has many roles, but two are of particular importance.
The first role consists in using a virtual package to associate a generic service with it (the package provides the service).
The second indicates that a package completely replaces another and that for this purpose, it can also satisfy the dependencies that the other would satisfy. It is thus possible to create a substitution package without having to use the same package name.
Metapackage and Virtual Package
It is essential to clearly distinguish metapackages from virtual packages. The former are real packages (including real .deb files), whose only purpose is to express dependencies.
Virtual packages, however, do not exist physically; they are only a means of identifying real packages based on common, logical criteria (for example, service provided, or compatibility with a standard program or a pre-existing package).
Replacing Files: The Replaces Field
The Replaces field indicates that the package contains files that are also present in another package, but that the package is legitimately entitled to replace them.
Configuration Scripts
In addition to the control file, the control.tar.gz archive for each Debian package may contain a number of scripts (postinst, postrm, preinst, prerm) called by dpkg at different stages in the processing of a package.
We can use dpkg -I to show these files as they reside in a .deb package archive:
$ dpkg -I /var/cache/apt/archives/zsh_5.3-1_amd64.deb | head
 new debian package, version 2.0.
 size 814486 bytes: control archive=2557 bytes.
     838 bytes,    20 lines      control
    3327 bytes,    43 lines      md5sums
     969 bytes,    41 lines   *  postinst             #!/bin/sh
     348 bytes,    20 lines   *  postrm               #!/bin/sh
     175 bytes,     5 lines   *  preinst              #!/bin/sh
     175 bytes,     5 lines   *  prerm                #!/bin/sh
 Package: zsh
 Version: 5.3-1
$ dpkg -I zsh_5.3-1_amd64.deb preinst
#!/bin/sh
set -e
# Automatically added by dh_installdeb
dpkg-maintscript-helper symlink_to_dir /usr/share/doc/zsh zsh-common 5.0.7-3 -- "$@"
# End automatically added section
The Debian Policy describes each of these files in detail, specifying the scripts called and the arguments they receive. These sequences may be complicated, since if one of the scripts fails, dpkg will try to return to a satisfactory state by canceling the installation or removal in progress (insofar as it is possible).
The pkg database
The pkg Database
We can traverse the dpkg database on the filesystem at
/var/lib/dpkg/. This directory contains a running record of all the packages that have been installed on the system. All of the configuration scripts for installed packages are stored in the/var/lib/dpkg/info/directory, in the form of a file prefixed with the package’s name:
$ ls /var/lib/dpkg/info/zsh.*
/var/lib/dpkg/info/zsh.list
/var/lib/dpkg/info/zsh.md5sums
/var/lib/dpkg/info/zsh.postinst
/var/lib/dpkg/info/zsh.postrm
/var/lib/dpkg/info/zsh.preinst
/var/lib/dpkg/info/zsh.prerm
This directory also includes a file with the .list extension for each package, containing the list of files that belong to that package:
$ head /var/lib/dpkg/info/zsh.list
/.
/bin
/bin/zsh
/bin/zsh5
/usr
/usr/lib
/usr/lib/x86_64-linux-gnu
/usr/lib/x86_64-linux-gnu/zsh
/usr/lib/x86_64-linux-gnu/zsh/5.2
/usr/lib/x86_64-linux-gnu/zsh/5.2/zsh
[...]
The /var/lib/dpkg/status file contains a series of data blocks describing the status of each package. The information from the control file of the installed packages is also replicated there.
$ more /var/lib/dpkg/status
Package: gnome-characters
Status: install ok installed
Priority: optional
Section: gnome
Installed-Size: 1785
Maintainer: Debian GNOME Maintainers
Architecture: amd64
Version: 3.20.1-1
[...]
In general, the preinst script is executed prior to installation of the package, while the postinst follows it. Likewise, prerm is invoked before removal of a package and postrm afterwards. An update of a package is equivalent to removal of the previous version and installation of the new one
Installation and Upgrade Script Sequence
Here is what happens during an installation (or an update):
For an update,
dpkgcalls theold-prerm upgrade new-version.Still for an update,
dpkgthen executesnew-preinst upgrade old-version; for a first installation, it executesnew-preinst install. It may add the old version in the last parameter if the package has already been installed and removed (but not purged, the configuration files having been retained).The new package files are then unpacked. If a file already exists, it is replaced, but a backup copy is made and temporarily stored.
For an update,
dpkgexecutesold-postrm upgrade new-version.dpkgupdates all of the internal data (file list, configuration scripts, etc.) and removes the backups of the replaced files. This is the point of no return:dpkgno longer has access to all of the elements necessary to return to the previous state.dpkgwill update the configuration files, prompting you to decide if it is unable to automatically manage this task.Finally,
dpkgconfigures the package by executingnew-postinst configure last-version-configured.
Package Removal
Here is what happens during a package removal.
dpkgcallsprerm remove.dpkgremoves all of the package’s files, with the exception of the configuration files and configuration scripts.dpkgexecutespostrm remove. All of the configuration scripts, exceptpostrm, are removed. If you have not used thepurgeoption, the process stops here.For a complete purge of the package (command issued with
dpkg --purgeordpkg -P), the configuration files are also deleted, as well as a certain number of copies (*.dpkg-tmp, *.dpkg-old, *.dpkg-new) and temporary files;dpkgthen executespostrm purge.
The debconf tool has many interesting features:
It requires the developer to specify user interaction;
It allows localization of all the displayed strings (all translations are stored in the templates file describing the interactions);
It provides different frontends for questions (text mode, graphical mode, non-interactive); and
It allows creation of a central database of responses to share the same configuration with several computers.
The most important feature is that all of the questions can be presented in a row, all at once, prior to starting a long installation or update process.
Checksums, Conffiles In addition to the maintainer scripts and control data already mentioned in the previous sections, the control.tar.gz archive of a Debian package may contain other interesting files:
# ar p /var/cache/apt/archives/bash_4.4-2_amd64.deb control.tar.gz | tar -tzf -
./
./conffiles
./control
./md5sums
./postinst
./postrm
./preinst
./prerm
The first
md5sumscontains the MD5 checksums for all of the package’s files. Its main advantage is that it allowsdpkg --verifyto check if these files have been modified since their installation.conffileslists package files that must be handled as configuration files. Configuration files can be modified by the administrator, anddpkgwill try to preserve those changes during a package update.In effect, in this situation, dpkg behaves as intelligently as possible:
if the standard configuration file has not changed between the two versions, it does nothing.
If, however, the file has changed, it will try to update this file.
Two cases are possible:
either the administrator has not touched this configuration file, in which case dpkg automatically installs the new version; or
the file has been modified, in which case dpkg asks the administrator which version they wish to use (the old one with modifications, or the new one provided with the package).
Using dnf
The dnf program provides a higher level of intelligent services for
using the underlying rpm program. It can automatically resolve
dependencies when installing, updating and removing packages. It
accesses external software repositories, synchronizing with them and
retrieving and installing software as needed.
The configuration files for repositories are located in the
/etc/yum.repos.d directory and have a .repo extension.
A very simple repo file might look like:
[repo-name]
name=Description of the repository
baseurl=http://example.com/path/to/repo
mirrorlist=http://example.com/path/to/mirrorlist
enabled=1
gpgcheck=1
Query packages
dnf search keyword                          : Searches for package with keyword in it
dnf info package-name                       : Displays information about a package
dnf list [installed | updates | available ] : Lists packages installed, available, or updates
dnf list package_name                       : list packages that contain a reference to package_name
dnf deplist package_name                    : list packages that contain a reference to package_name
dnf grouplist                               : Shows information about package groups installed, available and updates
dnf groupinfo packagegroup                  : Shows information about a package group
dnf provides /path/to/file                  : Shows the owner of the package for file
Installing/Removing/Upgrading Packages
dnf install package           : Installs a package
dnf localinstall package-file : Installs a package from a local rpm file
dnf groupinstall 'group-name' : Installs a specific software group
dnf remove package            : Removes a package from the system
dnf update                    : Update all packages
dnf check-update              : Check if any updates available
dnf list updates              : Check if any updates available
dnf update package            : Updates a package from a repository
During installation (or update), if a package has a configuration file
which is updated, it will rename the old configuration file with a
.rpmsave extension. If the old configuration file will still work
with the new software, it will name the new configuration file with a
.rpmnew extension.
Other commands
dnf list "dnf-plugin*"             : Lists additional dnf plugins
dnf repolist                       : Shows a list of enabled repositories
dnf shell                          : Provides an interactive shell in which to run multiple dnf commands.
dnf shell file.txt                 : Executes the commands in file.txt
dnf install --downloadonly package : Downloads the packages and store in the /var/cache/dnf directory
dnf history                        : Views the history of dnf commands on the system
dnf clean [packages|metadata|expire-cache|rpmdb|plugins|all] : Cleans up locally stored files and metadata under /var/cache/dnf.
Using yum
dnf replaced yum during the RHEL/CentOS 7 to 8 transition.
Yellowdog Updater Modified (yum) open source command-line package
management utility for RPM-compatible Linux OSs.
yum list package_name
yum info package_name
yum install package_name
yum remove package_name
Using zypper
zypper is the command line tool for installing and managing packages
in SUSE Linux and openSUSE. It is based on RPM and used for openSUSE.
zypper search package_name
zypper install package_name
zypper remove package_name
Queries
zypper list-updates                 : Shows a list of available updates
zypper repos                        : Lists available repositories
zypper search <string>              : Searches repositories for string
zypper info package_name            : Lists information about a package
zypper info --requires package_name : Check dependencies for the package
zypper search --provides filename   : Searches repositories to show what packages provide a file
Installing/Removing/Upgrading Packages
zypper install package_name : Installs or updates package(s)
zypper --non-interactive install package_name : Does not ask for confirmation when installing or upgrading (this is useful for scripts)
zypper update : Updates all packages on system from a repository
zypper --non-interactive update : Updates all packages on system from a repository, but does not ask for confirmation (this is useful for scripts)
zypper update package_name : Update a particular package
zypper remove package_name : Removes a package from the system
zypper remove --dry-run package_name : Dry-run removes a package from the system
Others
zypper shell : zypper in shell mode
zypper addrepo URI alias : add a new repository, located at the supplied URI and will use the supplied alias
zypper removerepo alias : remove a repository from the list using the alias of the repository
zypper clean [--all] : clean up and save space in /var/cache/zypp
Adding/Deleting/Modifying Users/Groups
Adding a new user is done with useradd, and removing an existing
user is done with userdel.
Typing id with no argument gives information about the current user,
as in:
id
uid=1001(bitvijays) gid=1001(bitvijays) groups=106(fuse),1001(bitvijays)
If given the name of another user as an argument, id will report
information about that other user.
useradd username : Add a user.
-m : Create a home directory
-s /bin/bash : set the shell for the user
userdel username : delete the username
-r : Ensure all files are also removed of that user
adduser (username> : Add a user.
--gecos GECOS : adduser won't ask for finger information.
--system : Create a system user.
--quiet : Suppress informational messages, only show warnings and errors.
--disabled-login : Do not run passwd to set the password.
deluser (username> : Delete a user.
--remove-home : Remove the home directory of the user and its mailspool.
--remove-all-files: Remove all files from the system owned by this user.
--backup : Backup all files contained in the userhome and the mailspool-file to a file named /$user.tar.bz2 or /$user.tar.gz.
usermod : Modify a user account.
-e EXPIREDATE : The date on which the user account will be disabled. The date is specified in the format YYYY-MM-DD.
-L, --lock : Lock a user's password.
-U, --unlock : Unlock a user's password
passwd -l user : Disable an account (lock out a user)
-u user : Enable an account (unlock a user)
addgroup : Add a group
delgroup : delete a group.
groupmod : Modifies a group's information (its gid or identifier). The command
gpasswd group : changes the password for the group
gpasswd -r group : Deletes the password for the group
groupadd : Create a new group.
groupdel : Delete a group.
chfn : (CHange Full Name), reserved for the super-user (root), modifies the GECOS, or "general information" field.
chsh : (CHange SHell) changes the user's login shell.
chage : (CHange AGE) allows the administrator to change the password expiration settings by passing the user name as an argument or
-l : list current settings
-e user : force the expiration of a password which forces the user to change their password the next time they log in.
The
addusercommand asks a few questions before creating the account. Its configuration file,/etc/adduser.conf, includes the settings. For example, define common groups, define default shells, and more.The creation of an account triggers the population of the user’s home directory with the contents of the
/etc/skel/template. This provides the user with a set of standard directories and configuration files.
Working with several groups
Each user may be a member of many groups. A user’s main group is, by default, created during initial user configuration.
By default, each file that a user creates belongs to the user, as well as to the user’s main group (May not be always desirable); for example, when the user needs to work in a directory shared by a group other than their main group.
In the above case, the user needs to change groups using
newgrp(starts a new shell), orsg(executes a command using the supplied alternate group).The above commands also allow the user to join a group to which they do not currently belong. If the group is password protected, they will need to supply the appropriate password before the command is executed.
Changing Group/Owner/Permission
In Linux and other UNIX-based OSs, every file is associated with a user who is the owner. Every file is also associated with a group (a subset of all users) that has an interest in the file and certain rights or permissions: read, write, and execute.
chown : Change file owner and group.
-reference=RFILE : use RFILE's owner and group rather than specifying OWNER:GROUP values.
-R, --recursive : operate on files and directories recursively.
chmod : change file mode bits.
chgrp : change group ownership.
SUID bit : SetUID bit specifies that an executable should run as its owner instead of the user executing it.
: SUID is most commonly used to run an executable as root, allowing users to perform tasks such as changing their passwords.
: If there is a flaw in a SUID root executable, you can run arbitrary code as root.
File Permissions Modes and chmod
Files have three kinds of permissions: read (r), write (w),
execute (x). These are generally represented as in rwx. These
permissions affect three groups of owners: user/owner (u), group
(g), and others (o).
$ ls -l somefile
-rw-rw-r-- 1 student student 1601 Mar 9 15:04 somefile
$ chmod uo+x,g-w somefile
$ ls -l somefile
-rwxr--r-x 1 student student 1601 Mar 9 15:04 somefile
where u stands for user (owner), o stands for other (world), and
g stands for group.
This kind of syntax can be difficult to type and remember, so one often uses a shorthand that lets you set all the permissions in one step. This is done with a simple algorithm, and a single-digit suffices to specify all three permission bits for each entity. This digit is the sum of:
4 if read permission is desired
2 if write permission is desired
1 if execute permission is desired.
Thus, 7 means read/write/execute, 6 means read/write, and 5 means read/execute.
When you apply this to the chmod command, we have to give three
digits for each degree of freedom, such as in:
$ chmod 755 somefile
$ ls -l somefile
-rwxr-xr-x 1 student student 1601 Mar 9 15:04 somefile
Unix Permissions
setuid and setgid
setuidandsetgid(symbolized with the letter s) are relevant to executable files and allow any user to execute the program with the rights of the owner or the group, respectivelyThe
setgidbit also applies to directories. Any newly-created item in such directories is automatically assigned the owner group of the parent directory, instead of inheriting the creator’s main group as usual.
stickybit
The sticky bit (symbolized by the letter “t”) is a permission useful in directories and used for temporary directories where everybody has write access (such as /tmp/): it restricts deletion of files so that only their owner or the owner of the parent directory can delete them.
Prefix a fourth digit to number where the setuid, setgid, and sticky bits are 4, 2, and 1, respectively. The command chmod 4754 will associate the setuid bit read, write and execute for the owner (since 7 = 4 + 2 + 1).
Mounting/Unmounting
The mount command is used to attach a filesystem (which can be local to the computer or on a network) somewhere within the filesystem tree. The basic arguments are the device node and mount point.
If you want it to be automatically available every time the system
starts up, you need to edit /etc/fstab accordingly (the name is
short for filesystem table). Looking at this file will show you the
configuration of all pre-configured filesystems. man fstab will
display how this file is used and how to configure it.
Executing mount without any arguments will show all presently mounted filesystems.
The command df -Th (disk-free) will display information about
mounted filesystems, including the filesystem type, and usage statistics
about currently used and available space.
mount <device> <dir> : Mount a filesystem.
-r, --read-only : Mount the filesystem read-only.
unmount {dir|device} : Unmount file systems.
NFS
NFS (Network File System) is a useful method for sharing files and data through network systems.
Server
On the server machine, NFS uses daemons (built-in networking and service processes in Linux), and other system servers are started at the command line by typing:
sudo systemctl start nfs
The text file /etc/exports contains the directories and permissions
that a host is willing to share with other systems over NFS. A very
simple entry in this file may look like the following:
/projects *.example.com(rw)
This entry allows the directory /projects to be mounted using NFS
with read and write (rw) permissions and shared with other hosts in the
example.com domain.
After modifying the /etc/exports file, we can type exportfs -av
to notify Linux about the directories you are allowing to be remotely
mounted using NFS. You can also restart NFS with sudo systemctl restart
nfs, but this is heavier, as it halts NFS for a short while before
starting it up again. To make sure the NFS service starts whenever the
system is booted, issue sudo systemctl enable nfs.
Client
On the client machine, if it is desired to have the remote filesystem
mounted automatically upon system boot, /etc/fstab is modified to
accomplish this. For example, an entry in the client’s /etc/fstab
might look like the following:
servername:/projects /mnt/nfs/projects nfs defaults 0 0
We can also mount the remote filesystem without a reboot or as a
one-time mount by directly using the mount command:
sudo mount servername:/projects /mnt/nfs/projects
Remember, if /etc/fstab is not modified, this remote mount will not
be present the next time the system is restarted. Furthermore, we may
want to use the nofail option in fstab in case the NFS server is
not live at boot.
Explore Mounted FileSystem
Typically, mount will show more filesystems mounted than are shown
in /etc/fstab, which only lists those which are explicitly
requested. The system, however, will mount additional special
filesystems required for normal operation, which are not enumerated in
/etc/fstab.
Another way to show mounted filesystems is to type:
sudent:/tmp> cat /proc/mounts
which is essentially how the utility gets its information.
cat /etc/fstab
cat /proc/mounts
mount
Sysctl - configure kernel parameters
/etc/sysctl.conf : Contains the variables for kernel parameters.
sysctl -a : Display all the kernel parameters
sysctl -w <kernel parameter> : Change a sysctl setting.
Note
To make permanent changes to the kernel, edit the /etc/sysctl.conf file.
Kernel Modules
Kernel modules are contained in /lib/modules/$(uname -r)/
lsmod : list all loaded modules
modprobe : load kernel modules
lspci : list all pci devices
lsusb : list all usb devices
hal-device : list all the Hardware Abstraction layer devices
lspcmcia : lists PCMCIA cards
lsdev : lists communication resources used by devices
lshw : displays a long description of the hardware discovered in a hierarchical manner
Manage Runlevels
Debian GNU provides a convenient tool to manage runlevels (to control when services are started and shut down);
update-rc.d
update-rc.d and there are two commonly used invocation methods:
update-rc.d -f <service name> remove : Disabling a service.
update-rc.d <service name> defaults : Insert links using defaults, start in runlevel 2-5 and stop in runlevels 0,1 and 6.
systemctl
Control the systemd system and service manager. systemctl may be used to introspect and control the state of the “systemd” system and service manager. Present a detailed output about the different services running.
systemctl status <service_name> - Status of the service.
systemctl start <service_name> - Start the service.
systemctl enable <service_name> - Enable the service to start at a boot time.
systemctl reload <service_name> - Reload the new settings (after changing configuration files)
Printing
Printing itself requires software that converts information from the application used to a language your printer can understand. The Linux standard for printing software is the Common UNIX Printing System (CUPS). It converts page descriptions produced by your application (put a paragraph here, draw a line there, and so forth) and then sends the information to the printer. It acts as a print server for both local and network printers.
CUPS
CUPS carries out the printing process with the help of its various components:
Configuration Files
Scheduler
Job Files
Log Files
Filter
Printer Drivers
Backend.
Configuration files
CUPS is designed around a print scheduler that manages print jobs, handles administrative commands, allows users to query the printer status, and manages the flow of data through all CUPS components.
The print scheduler reads server settings from several configuration
files, the two most important of which are cupsd.conf and
printers.conf, and all other CUPS-related configuration files are
stored under the /etc/cups/ directory.
cupsd.confcontains the system-wide settings; it does not contain any printer-specific details. Most of the settings available in this file relate to network security, i.e. which systems can access CUPS network capabilities, how printers are advertised on the local network, what management features are offered, and so on.printers.confis where you will find the printer-specific settings. For every printer connected to the system, a corresponding section describes the printer’s status and capabilities. This file is generated or modified only after adding a printer to the system and should not be modified by hand
Scheduler
CUPS stores print requests as files under the /var/spool/cups
directory (these can actually be accessed before a document is sent to a
printer). Data files are prefixed with the letter d while control
files are prefixed with the letter c.
After a printer successfully handles a job, data files are automatically removed. These data files belong to what is commonly known as the print queue.
Log files
Log files are placed in /var/log/cups and are used by the scheduler
to record activities that have taken place. These files include access,
error, and page records.
To view what log files exist, type:
sudo ls -l /var/log/cups
Filter, Printer Drivers, Backend
CUPS uses filters to convert job file formats to printable formats.
Printer drivers contain descriptions for currently connected and
configured printers and are usually stored under /etc/cups/ppd/. The
print data is then sent to the printer through a filter and via a
backend that helps to locate devices connected to the system.
So, in short, when we execute a print command, the scheduler validates the command and processes the print job, creating job files according to the settings specified in the configuration files. Simultaneously, the scheduler records activities in the log files. Job files are processed with the help of the filter, printer driver, and backend and then sent to the printer
Managing CUPS
systemctl status cups
sudo systemctl [enable|disable] cups
sudo systemctl [start|stop|restart] cups
Adding printers from CUPS Web interface
CUPS also comes with its own web server, which makes a configuration interface available via a set of CGI scripts.
This web interface allows you to:
Add and remove local/remote printers
Configure printers:
Local/remote printers
Share a printer as a CUPS server
Control print jobs:
Monitor jobs
Show completed or pending jobs
Cancel or move jobs.
The CUPS web interface is available on your browser at
http://localhost:631.
Printing document
Printing from GUI
Many graphical applications allow users to access printing features
using the CTRL-P shortcut. To print a file, we need to specify the
printer (or a file name and location if you are printing to a file
instead) we want to use; and then select the page setup, quality, and
color options. After selecting the required options, you can submit the
document for printing. The document is then submitted to CUPS. We can
use your browser to access the CUPS web interface at
http://localhost:631/ to monitor the status of the printing job.
Printing from Command line
CUPS provides two command-line interfaces, descended from the System V
and BSD flavors of UNIX. This means that you can use either lp
(System V) or lpr (BSD) to print.
lp is just a command-line front-end to the lpr utility that
passes input to lpr.
lp and lpr accept command-line options that help to perform all
operations that the GUI can accomplish. lp is typically used with a
file name as an argument.
lp <filename> : To print the file to default printer
lp -d printer <filename> : To print to a specific printer (useful if multiple printers are available)
program | lp : print the output of a program
echo string | lp : To print the output of the echo
lp -n number <filename> : To print multiple copies
lpoptions -d printer : To set the default printer
lpq -a : To show the queue status
lpadmin : To configure printer queues
lpoptions : can be used to set printer options and defaults.
Each printer has a set of tags associated with it, such as the default number of copies and authentication requirements. You can type lpoptions help to obtain a list of supported options. lpoptions can also be used to set system-wide values, such as the default printer.
Managing Printing jobs
lpstat -p -d : To get a list of available printers, along with their status
lpstat -a : To check the status of all connected printers, including job numbers
cancel job-id
lprm job-id : to cancel a print job
lpmove job-id newprinter : To move a print job to newprinter
PostScript and PDF
PostScript is a standard page description language. It effectively manages the scaling of fonts and vector graphics to provide quality printouts. It is purely a text format that contains the data fed to a PostScript interpreter.
enscript is a tool that is used to convert a text file to PostScript
and other formats. It also supports Rich Text Format (RTF) and HyperText
Markup Language (HTML).
Example: We can convert a text file to two columns (-2) formatted PostScript:
enscript -2 -r -p psfile.ps textfile.txt
This command will also rotate (-r) the output to print, so the width of the paper is greater than the height (aka landscape mode), thereby reducing the number of pages required for printing.
enscript -p psfile.ps textfile.txt : Convert a text file to PostScript (saved to psfile.ps)
enscript -n -p psfile.ps textfile.txt : Convert a text file to n columns where n=1-9 (saved in psfile.ps)
enscript textfile.txt : Print a text file directly to the default printer
Converting between PostScript and PDF
pdf2ps file.pdf : Converts file.pdf to file.ps
ps2pdf file.ps : Converts file.ps to file.pdf
pstopdf input.ps output.pdf : Converts input.ps to output.pdf
pdftops input.pdf output.ps : Converts input.pdf to output.ps
convert input.ps output.pdf : Converts input.ps to output.pdf
convert input.pdf output.ps : Converts input.pdf to output.ps
Linux PDF Reader
evince, okular, ghostView and xpdf
Manipulating PDF
At times, we may want to merge, split, or rotate PDF files; not all of these operations can be achieved while using a PDF viewer. Some of these operations include:
Merging/splitting/rotating PDF documents
Repairing corrupted PDF pages
Pulling single pages from a file
Encrypting and decrypting PDF files
Adding, updating, and exporting a PDF’s metadata
Exporting bookmarks to a text file
Filling out PDF forms
qpdf
qpdf --empty --pages 1.pdf 2.pdf -- 12.pdf : Merge the two documents 1.pdf and 2.pdf. The output will be saved to 12.pdf.
qpdf --empty --pages 1.pdf 1-2 -- new.pdf : Write only pages 1 and 2 of 1.pdf. The output will be saved to new.pdf.
qpdf --rotate=+90:1 1.pdf 1r.pdf : Rotate page 1 of 1.pdf 90 degrees clockwise and save to 1r.pdf
qpdf --rotate=+90:1-z 1.pdf 1r-all.pdf : Rotate all pages of 1.pdf 90 degrees clockwise and save to 1r-all.pdf
Encrypting PDF files with qpdf
qpdf --encrypt mypw mypw 128 -- public.pdf private.pdf : Encrypt with 128 bits public.pdf using as the passwd mypw with output as private.pdf
qpdf --decrypt --password=mypw private.pdf file-decrypted.pdf : Decrypt private.pdf with output as file-decrypted.pdf.
pdftk
pdftk 1.pdf 2.pdf cat output 12.pdf : Merge the two documents 1.pdf and 2.pdf. The output will be saved to 12.pdf.
pdftk A=1.pdf cat A1-2 output new.pdf : Write only pages 1 and 2 of 1.pdf. The output will be saved to new.pdf.
pdftk A=1.pdf cat A1-endright output new.pdf : Rotate all pages of 1.pdf 90 degrees clockwise and save result in new.pdf.
Encrypting PDF Files with pdftk
pdftk public.pdf output private.pdf user_pw PROMPT
When we run this command, we will receive a prompt to set the required password, which can have a maximum of 32 characters. A new file, private.pdf, will be created with the identical content as public.pdf, but anyone will need to type the password to be able to view it.
Ghost script
Combine three PDF files into one:
gs -dBATCH -dNOPAUSE -q -sDEVICE=pdfwrite -sOutputFile=all.pdf file1.pdf file2.pdf file3.pdf
Split pages 10 to 20 out of a PDF file:
gs -sDEVICE=pdfwrite -dNOPAUSE -dBATCH -dDOPDFMARKS=false -dFirstPage=10 -dLastPage=20 -sOutputFile=split.pdf file.pdf
Other pdf tool
pdfinfo
It can extract information about PDF files, especially when the files are very large or when a graphical interface is not available.
flpsed
It can add data to a PostScript document. This tool is specifically useful for filling in forms or adding short comments to the document.
pdfmod
It is a simple application that provides a graphical interface for modifying PDF documents. Using this tool, you can reorder, rotate, and remove pages; export images from a document; edit the title, subject, and author; add keywords, and combine documents using drag-and-drop action.
Programming
GIT
Version Control System, really useful for tracking your changes. It has two important data structures: an object database and a directory cache.
The object database contains objects of three varieties:
Blobs: Chunks of binary data containing file contents
Trees: Sets of blobs including file names and attributes, giving the directory structure
Commits: Changesets describing tree snapshots.
The directory cache captures the state of the directory tree.
try.github.com (https://try.github.com) 15 mins tutorial.
Command-line substitute for gitk
git log --graph --abbrev-commit --pretty=oneline --decorate
List all commits for a specific file
git log --follow -- filename
See the changes in a Git commit?
git show (COMMIT)
cc - GNU Compile Collection
To Compile: gcc -Wall -pedantic -g (C source file> -o (Executable file>
-Wall -pedantic : to check for all the warnings and errors if any.
-g : to create the symbol file to be used by gdb
-o : to create the executable file.
GDB: GNU debugger
gdb -tui (Program name>
tui : for listing the source while debugging
(linenumber> : to set the break point
p (variable name> : to print the value of the variable
bt : to print the stack call, mainly useful to find segmentation fault when multiple functions are called.
Basic Linux Security
A good approach to help with the security starts with the following questions:
What are we trying to protect? The security policy will be different depending on whether we want to protect computers or data. In the latter case, we also need to know which data.
What are we trying to protect against? Is it leakage of confidential data? Accidental data loss? Revenue loss caused by disruption of service?
Also, who are we trying to protect against? Security measures will be quite different for guarding against a typo by a regular user of the system versus protecting against a determined external attacker group.
General Tips
File extensions in Linux do not necessarily mean that a file is of a certain type.
Might want to setup fail2ban, which will make it much harder to brute-force passwords over the network (by filtering away IP addresses that exceed a limit of failed login attempts).
By default, Linux distinguishes between several account types in order to isolate processes and workloads. Linux has four types of accounts:
root
System
Normal
Network
For a safe working environment, it is advised to grant the minimum
privileges possible and necessary to accounts and remove inactive
accounts. The last utility, which shows the last time each user
logged into the system, can be used to help identify potentially
inactive accounts which are candidates for system removal.
Firewall
A firewall is a piece of computer equipment with hardware, software, or both that parses the incoming or outgoing network packets and only lets through those matching certain predefined conditions.
A filtering network gateway is a type of firewall that protects an entire network. It is usually installed on a dedicated machine configured as a gateway for the network so that it can parse all packets that pass in and out of the network.
The Linux kernel embeds the netfilter firewall. We can control netfilter from user space with the iptables and ip6tables commands. We can also use the excellent GUI-based fwbuilder tool, which provides a graphical representation of the filtering rules.
Netfilter Behavior
Netfilter uses four distinct tables, which store rules regulating three kinds of operations on packets:
filter - concerns filtering rules (accepting, refusing, or ignoring a packet);
nat (Network Address Translation) - concerns translation of source or destination addresses and ports of packets;
mangle - concerns other changes to the IP packets (including the ToS—Type of Service—field and options);
raw - allows other manual modifications on packets before they reach the connection tracking system.
Chains
Each table contains lists of rules called chains. The firewall uses standard chains to handle packets based on predefined circumstances.
The filter table has three standard chains:
INPUT - concerns packets whose destination is the firewall itself.
OUTPUT - concerns packets emitted by the firewall.
FORWARD - concerns packets passing through the firewall (which is neither their source nor their destination).
The nat table also has three standard chains:
PREROUTING - to modify packets as soon as they arrive.
POSTROUTING - to modify packets when they are ready to go on their way.
OUTPUT - to modify packets generated by the firewall itself.
Each chain is a list of rules; each rule is a set of conditions and an action to perform when the conditions are met. When processing a packet, the firewall scans the appropriate chain, one rule after another, and when the conditions for one rule are met, it jumps (hence the -j option in the commands with Rules) to the specified action to continue processing.
Actions
Listed below are the Netfilter actions.
ACCEPT: allow the packet to go on its way.
REJECT: reject the packet with an Internet control message protocol (ICMP) error packet (the –reject-with type option of iptables determines the type of error to send).
DROP: delete (ignore) the packet.
LOG: log (via syslogd) a message with a description of the packet. Note that this action does not interrupt processing, and the execution of the chain continues at the next rule, which is why logging refused packets requires both a LOG and a REJECT/DROP rule. Common parameters associated with logging include: –log-level, with default value warning, indicates the syslog severity level. –log-prefix allows specifying a text prefix to differentiate between logged messages. –log-tcp-sequence, –log-tcp-options, and –log-ip-options indicate extra data to be integrated into the message: respectively, the TCP sequence number, TCP options, and IP options.
ULOG: log a message via ulogd, which can be better adapted and more efficient than syslogd for handling large numbers of messages; note that this action, like LOG, also returns processing to the next rule in the calling chain.
chain_name: jump to the given chain and evaluate its rules.
RETURN: interrupt processing of the current chain and return to the calling chain; in case the current chain is a standard one, there’s no calling chain, so the default action (defined with the -P option to iptables) is executed instead.
SNAT (only in the nat table): apply Source Network Address Translation (SNAT). Extra options describe the exact changes to apply, including the –to-source address:port option, which defines the new source IP address and/or port.
DNAT (only in the nat table): apply Destination Network Address Translation (DNAT). Extra options describe the exact changes to apply, including the –to-destination address:port option, which defines the new destination IP address and/or port.
MASQUERADE (only in the nat table): apply masquerading (a special case of Source NAT).
REDIRECT (only in the nat table): transparently redirect a packet to a given port of the firewall itself; this can be used to set up a transparent web proxy that works with no configuration on the client side, since the client thinks it connects to the recipient whereas the communications actually go through the proxy. The –to-ports port(s) option indicates the port, or port range, where the packets should be redirected.
iptables syntax
The iptables and ip6tables commands are used to manipulate tables, chains, and rules. Their -t table option indicates which table to operate on (by default, filter).
Commands
The major options for interacting with chains are listed below:
-L chainlists the rules in the chain. This is commonly used with the-noption to disable name resolution (for example,iptables -n -L INPUTwill display the rules related to incoming packets).-N chaincreates a new chain. We can create new chains for a number of purposes, including testing a new network service or fending off a network attack.-X chaindeletes an empty and unused chain (for example,iptables -X ddos-attack).-A chainrule adds a rule at the end of the given chain. Remember that rules are processed from top to bottom so be sure to keep this in mind when adding rules.-I chain rule_num ruleinserts a rule before the rule numberrule_num. As with the-Aoption, keep the processing order in mind when inserting new rules into a chain.-D chain rule_num(or-D chain rule) deletes a rule in a chain; the first syntax identifies the rule to be deleted by its number (iptables -L --line-numberswill display these numbers), while the latter identifies it by its contents.-F chainflushes a chain (deletes all its rules). For example, to delete all of the rules related to outgoing packets, we would runiptables -F OUTPUT. If no chain is mentioned, all the rules in the table are deleted.-P chain actiondefines the default action, or “policy” for a given chain; note that only standard chains can have such a policy. To drop all incoming traffic by default, we would runiptables -P INPUT DROP.
Rules
Each rule is expressed as
conditions -j action action_options. If several conditions are described in the same rule, then the criterion is the conjunction (logical AND) of the conditions, which is at least as restrictive as each individual condition.The
-p protocolcondition matches the protocol field of the IP packet. The most common values aretcp,udp,icmp, andicmpv6. The condition can be complemented with conditions on the TCP ports, with clauses such as--source-port portand--destination-port port.Negating Conditions: Prefixing a condition with an exclamation mark negates the condition. For example, negating a condition on the
-poption matches “any packet with a different protocol than the one specified.” This negation mechanism can be applied to all other conditions as well.The
-s addressor-s network/maskcondition matches the source address of the packet. Correspondingly,-d addressor-d network/maskmatches the destination address.The
-iinterface condition selects packets coming from the given network interface.-o interfaceselects packets going out on a specific interface.The
--state statecondition matches the state of a packet in a connection (this requires theipt_conntrackkernel module, for connection tracking).NEWstate describes a packet starting a new connection,ESTABLISHEDmatches packets belonging to an already existing connection, andRELATEDmatches packets initiating a new connection related to an existing one (which is useful for the ftp-data connections in the “active” mode of the FTP protocol).
Examples
Silently block incoming traffic from the IP address 10.0.1.5 and the 31.13.74.0/24 class C subnet:
# iptables -A INPUT -s 10.0.1.5 -j DROP
# iptables -A INPUT -s 31.13.74.0/24 -j DROP
To allow users to connect to SSH, HTTP, and IMAP, we could run the following commands:
# iptables -A INPUT -m state --state NEW -p tcp --dport 22 -j ACCEPT
# iptables -A INPUT -m state --state NEW -p tcp --dport 80 -j ACCEPT
# iptables -A INPUT -m state --state NEW -p tcp --dport 143 -j ACCEPT
fwbuilder
Firewall Builder makes it easy to configure your firewalls.
fwbuilderwill generate a script configuring the firewall according to the rules defined. Its modular architecture gives it the ability to generate scripts targeting different systems includingiptablesfor Linux,ipffor FreeBSD, andpffor OpenBSD.
Operations requiring root privileges
root privileges are required to perform operations such as:
Creating, removing, and managing user accounts
Managing software packages
Removing or modifying system files
Restarting system services.
Operations not requiring root privileges
A regular account user can perform some operations requiring special permissions; however, the system configuration must allow such abilities to be exercised.
SUID
SUID (Set owner User ID upon execution - similar to the Windows “run as” feature) is a special kind of file permission given to a file.
Use of SUID provides temporary permissions to a user to run a program with the permissions of the file owner (which may be root) instead of the permissions held by the user.
The below operations do not require root privileges.
Running a network client (Sharing a file over the network)
Using devices such as printers (Printing over the network)
Operations on files that the user has proper permissions to access
Running SUID-root applications : (Executing programs such as passwd)
Process Isolation
Linux is considered to be more secure than many other OSs because processes are naturally isolated from each other. One process normally cannot access the resources of another process, even when that process is running with the same user privileges. Linux thus makes it difficult (though certainly not impossible) for viruses and security exploits to access and attack random resources on a system.
More recent additional security mechanisms that limit risks even further include:
Control Groups (cgroups) : Allows system administrators to group processes and associate finite resources to each cgroup.
Containers : Makes it possible to run multiple isolated Linux systems (containers) on a single system by relying on cgroups.
Virtualization : Hardware is emulated in such a way that not only processes can be isolated, but entire systems are run simultaneously as isolated and insulated guests (virtual machines) on one physical host
Password storage
The system verifies authenticity and identity using user credentials.
Originally, encrypted passwords were stored in the /etc/passwd file,
which was readable by everyone. This made it rather easy for passwords
to be cracked.
On modern systems, passwords are actually stored in an encrypted format
in a secondary file named /etc/shadow. Only those with root access
can read or modify this file.
Password Algorithm
A modern password encryption algorithm called SHA-512 (Secure Hashing Algorithm 512 bits) is used to encrypt passwords.
The SHA-512 algorithm is widely used for security applications and protocols such as TLS, SSL, PHP, SSH, S/MIME, and IPSec.
Good Password Practices
IT professionals follow several good practices for securing the data and the password of every user.
Password aging is a method to ensure that users get prompts that remind them to create a new password after a specific period. This can ensure that passwords if cracked, will only be usable for a limited amount of time. This feature is implemented using
chage, which configures the password expiry information for a user.Another method is to force users to set strong passwords using Pluggable Authentication Modules (PAM). PAM can be configured to automatically verify that a password created or modified using the
passwdutility is sufficiently strong. PAM configuration is implemented using a library calledpam_cracklib.so, which can also be replaced bypam_passwdqc.soto take advantage of more options.
Requiring Boot Loader Passwords
We can secure the boot process with a secure password to prevent someone from bypassing the user authentication step. This can work in conjunction with password protection for the BIOS. Note that while using a bootloader password alone will stop a user from editing the bootloader configuration during the boot process, it will not prevent a user from booting from an alternative boot media such as optical disks or pen drives. Thus, it should be used with a BIOS password for full protection.
For the older GRUB 1 boot method, it was relatively easy to set a password for grub. However, for the GRUB 2 version, things became more complicated. However, you have more flexibility and can take advantage of more advanced features, such as user-specific passwords (which can be their normal login ones.)
Furthermore, we should never edit grub.cfg directly; instead, modify
the configuration files in /etc/grub.d and /etc/defaults/grub,
and then run update-grub, or grub2-mkconfig and save the new
configuration file.
Hardware Security
When hardware is physically accessible, security can be compromised by:
Key logging : Recording the real-time activity of a computer user, including the keys they press. The captured data can either be stored locally or transmitted to remote machines.
Network sniffing : Capturing and viewing the network packet level data on your network.
Booting with a live or rescue disk : Remounting and modifying disk content.
The guidelines of security are:
Lockdown workstations and servers.
Protect your network links such that it cannot be accessed by people you do not trust.
Protect your keyboards where passwords are entered to ensure the keyboards cannot be tampered with.
Ensure a password protects the BIOS in such a way that the system cannot be booted with a live or rescue DVD or USB key.
Automatic Linux Install
The Debian installers is modular: at the basic level, are executing many scripts (packaged in tiny packages called udeb—for μdeb or micro-deb) one after another.
Each script relies on debconf (which interacts with the user, and stores installation parameters).
The installer can also be automated through debconf preseeding, a function that allows to provide unattended answers to installation questions.
There are multiple ways to preseed answers to the installer.
Preseeding answers
With Boot Parameters
Installer question can be pre-seeded with boot parameters that end up in the kernel command-line, accessible through /proc/cmdline.
We can directly use the full identifier of the debconf questions (such as debian-installer/language=en) or use abbreviations for the most common questions (like language=en or hostname=node-0002).
With a Preseed File in the Initrd
We can add a file named preseed.cfg at the root of the installer’s initrd (used to start the installer). Usually, this requires rebuilding the debian-installer source package to generate new versions of the initrd.
With a Preseed File in the Boot Media
We can add a preseed file on the boot media (DVD or USB key); preseeding then happens as soon as the media is mounted, which means right after the questions about language and keyboard layout. The preseed/file boot parameter can be used to indicate the location of the preseeding file (for instance,
/cdrom/preseed.cfgwhen installing from a DVD-ROM, or/media/preseed.cfgwhen installing from a USB key).May not preseed answers to language and country options as the preseeding file is loaded later in the process, once the hardware drivers have been loaded.
With a Preseed File Loaded from the Network
We can make a preseed file available on the network through a web server and tell the installer to download that preseed file by adding the boot parameter
preseed/url=http://server/preseed.cfg(or by using the url alias).Remember that the network must first be configured which means that network-related debconf questions (in particular hostname and domain name) and all the preceding questions (like language and country) cannot be preseeded with this method.
Delaying the Language, Country, Keyboard Questions
To overcome the limitation of not being able to preseed the language, country, and keyboard questions, we can add the boot parameter
auto-install/enable=true(orauto=true). With this option the questions will be asked later in the process, after the network has been configured and thus after download of the preseed file.The downside is that the first steps (notably network configuration) will always happen in English and if there are errors the user will have to work through English screens (with a keyboard configured in QWERTY).
Creating a Preseed file
A preseed file is a plain text file in which each line contains the answer to one Debconf question. A line is split across four fields separated by white space (spaces or tabs).
For example:
d-i debian-installer/language string enThe first field indicates the owner of the question. For example, “d-i” is used for questions relevant to the installer. You may also see a package name, for questions coming from Debian packages (as in this example: atftpd atftpd/use_inetd boolean false).
The second field is an identifier for the question.
The third field lists the type of question.
The fourth and final field contains the value for the expected answer. Note that it must be separated from the third field with a single space; additional space characters are considered part of the value.
The simplest way to write a preseed file
is to install a system by hand.
Then the
debconf-get-selections --installerwill provide the answers provided to the installer.We can obtain answers directed to other packages with
debconf-get-selections. However, a cleaner solution is to write the preseed file by hand, starting from an example and then going through the documentation. With this approach, only questions where the default answer needs to be overridden can be preseeded. Provide thepriority=criticalboot parameter to instruct Debconf to only ask critical questions, and to use the default answer for others.
Debugging failed installations
We can debug failed installations with virtual consoles (accessible with the CTRL+ALT and function keys), debconf-get and debconf-set commands, reading the /var/log/syslog log file, or by submitting a bug report with log files retrieved with the installer’s “Save debug logs” function.
Monitoring and Logging
The
logcheckprogram monitors log files every hour by default and sends unusual log messages in emails to the administrator for further analysis. The list of monitored files is stored in/etc/logcheck/logcheck.logfiles.It is a good idea to read
/usr/share/doc/logcheck-database/README.logcheck-database.gz.
Detecting changes
Once a system is installed and configured, most system files should stay relatively static until the system is upgraded.
Therefore, it is a good idea to monitor changes in system files since any unexpected change could be cause for alarm and should be investigated.
Auditing Packages with dpkg –verify
dpkg --verify(ordpkg -V) is an interesting tool since it displays the system files that have been modified, but this output should be taken with a grain of salt.Running
dpkg -Vwill verify all installed packages and will print out a line for each file that fails verification. Each character denotes a test on some specific meta-data. Unfortunately, dpkg does not store the meta-data needed for most tests and will thus output question marks for them.
Monitoring Files: AIDE
The Advanced Intrusion Detection Environment (AIDE) tool checks file integrity and detects any change against a previously-recorded image of the valid system.
The image is stored as a database (
/var/lib/aide/aide.db) containing the relevant information on all files of the system (fingerprints, permissions, timestamps, and so on).We can use options in
/etc/default/aideto tweak the behavior of the aide package. The AIDE configuration proper is stored in/etc/aide/aide.confand/etc/aide/aide.conf.d/(actually, these files are only used byupdate-aide.confto generate/var/lib/aide/aide.conf.autogenerated).The configuration indicates which properties of which files need to be checked. For instance, the contents of log files changes routinely, and such changes can be ignored as long as the permissions of these files stay the same, but both contents and permissions of executable programs must be constant.
Monitoring /etc directory
Etckeeper may be a bit more advanced, and it is used to put your whole /etc directory under revision control. To install and initialize it,
apt-get install etckeeper
etckeeper init
cd /etc
git commit -am Initial
After that, you can see pending changes in /etc by cd-ing into it and running
git status or git diff
at any time, and you can see previous, committed changes by running
git log or git log -p
You can override pending changes to any file with the last committed version with
git checkout FILENAME
Others
Tripwire is very similar to AIDE; even the configuration file syntax is almost the same. The main addition provided by tripwire is a mechanism to sign the configuration file so that an attacker cannot make it point at a different version of the reference database.
Samhain also offers similar features as well as some functions to help detect rootkits.
checksecurity consists of several small scripts that perform basic checks on the system (searching for empty passwords, new setuid files, and so on) and warn you if these conditions are detected.
The chkrootkit and rkhunter packages detect certain rootkits potentially installed on the system.
Tips and tricks
Apt-get error?
We often make mistakes while updating using apt-get, which just leaves us with command-line access to the system (GUI messed up). Possibly we unintentionally removed some necessary packages.
In this case, look for /var/log/apt/history.log, look for the time
around which your system was broken. Copy the removed packages, which
would be in the format of
libapt-inst1.5:amd64 (0.9.7.9+deb7u5, 0.9.7.9+deb7u6), apt-utils:amd64 (0.9.7.9+deb7u5, 0.9.7.9+deb7u6).
To reinstall these packages, you just need the package name such as
libapt-inst1.5, apt-utils.
-Step1- : Use sed to search for pattern "), " and replace it with "), \n". This would separate the packages by new line. Within vi ":%s/), /\n/g"
-Step2- : Use cut -d ":" -f 1 to remove :amd64 and anything after that.
-Step3- : Now, we have to get them back in one line rather than multiple lines. Within vi ":%s/\n/ /g"
Finding most open ports in nmap scan
grep "^[0-9]\+" (nmap file .nmap extension> | grep "\ open\ " | sort | uniq -c | sort -rn | awk '{print "\""$1"\",\""$2"\",\""$3"\",\""$4"\",\""$5" "$6" "$7" "$8" "$9" "$10" "$11" "$12" "$13"\""}' > test.csv
Interesting Stuff
Linux Monitoring Tools : Server density has written the most comprehensive list of 80 Linux Monitoring Tools
Windows Monitoring Tools : Server density has written a similar list for Windows too 60+ Windows Monitoring Tools